Elvira’s House of Horrors
Game Information & Overview:
- Designer: Dennis Nordman
- Code/Rules: Lyman Sheats (prior to 1.00),
- Lead Mechanical Engineer: Tom Kopera
- Artwork: Greg Freres
- Display and Animations: Chuck Ernst
- Sound Design: Jerry Thompson
- Release Date: October 2019
- Wiki Rulesheet based on Code Rev: 1.01
- Edit the Code revision, if applicable, when you make changes
The mistress of the dark returns in Elvira’s House of Horrors, released by Stern Pinball at the end of 2019. Characters from 26 of the most infamous horror B-movies of all time have invaded a haunted house, and are wreaking havoc that can only be stopped by putting the characters back in the movies where they came from. You’ll also have to put up with Deadheads, Gar-Goils, and other creatures on your quest to clear the house.
Layout
Premium:
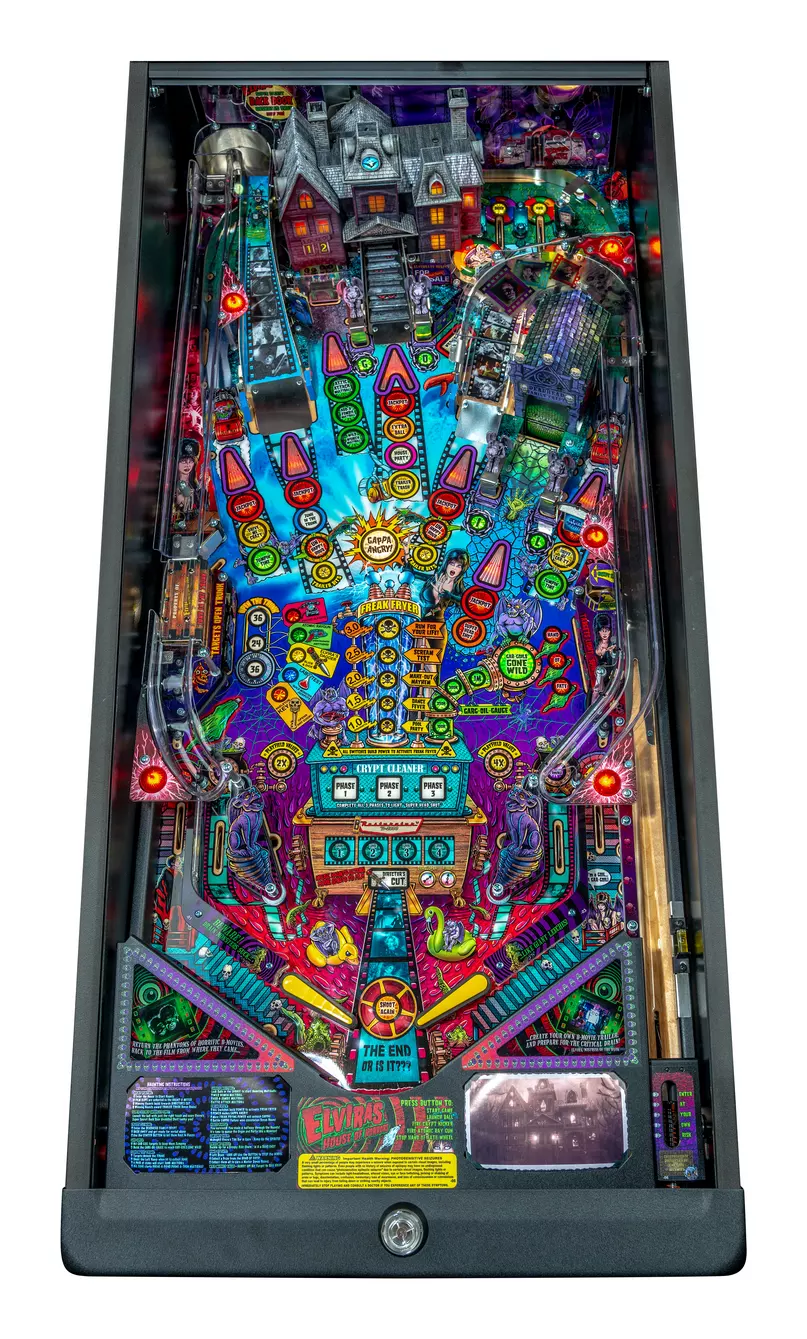
Skill Shots
There are two Skill Shots on this game:
- Plunging the ball so it lands in either Dead End lane will award 250k increasing by 25k each time a successful Skill Shot is made & increase bonus X by +5x.
- Plunging the ball so it lands into the Back Door will award 1M (increasing by 250k each time a successful back door shot is made, maxing out at 2.5M) and instantly qualify a Haunt at the house entrance. If a Haunt has already been qualified, making this Skill Shot will immediately start it. If the Back Door Skill Shot is made during a Haunt or during Gappa Angry, it will advance the mode (spot next mode shot). The ball can also fall into the Back Door during Haunts via weak orbit shots, in which case it will spot progress on the current mode.
Main Objectives
The taunting is over; the haunting begins! Elvira has just moved into a new home that happens to be haunted by all sorts of creatures, some ripped from the silver screen and some spooky refugees from her previous pinball machines. With Elvira’s help the player must sweep the house clean of its horrors and try to sell it once the deed is done.
There are seven tasks the player needs to complete in order to start Wild Market Value and escape the house. Each task is listed below, and each one scores a value starting at 5M & increasing by 5M for each one completed.
Haunts
The characters from some of the most infamous horror movies ever made are causing havoc in Elvira’s house and it’s up to you to get them back to their respective movie. Each mode has a unique introduction from the Mistress of the Dark herself.
Start a Haunt by shooting the House Entrance enough times; when it’s RGB light is flashing purple, the next shot to the House will begin the Haunt. The windows of the House correspond to the Haunts and you can use either flipper to change which room you want to enter (see below). Once you’ve obtained a Skeleton Key from the Trunk, you will be able to access “locked” Haunts by selecting the window at the far right.
Unless otherwise noted below, for each Haunt, the base value per shot starts at 500k and the final shot value starts at 2M. Each shot made during the Haunt collects the base value and increments both the base value and the final shot value.
All Haunts start with 45 seconds on the clock. The timer pauses if the ball enters the bumpers. Making a lit shot to advance the Haunt with less than 15 seconds left will always reset the timer back to 15 seconds.
If you drain or time out during a Haunt, you won’t be able to play it again until They Came From Space is played.
Completing any Haunt will qualify the Trailer Trash hurry-up at the House and advance your B-Restorator rank towards lighting Director’s Cut after four Haunts have been completed. Completing two Haunts lights Extra Ball.
There are six main Haunts in the game. These can be accessed even without the Skeleton Key.
- Night of the Living Dead: (Right side of house, basement window)
- Stage 1: 500k increment. Shoot the House to proceed to stage 2. Each ramp can be shot once for more points before shooting the House.
- Stage 2: 100k increment. All shots except the House Entrance are lit to destroy Ghouls. If a shot is made, it will turn off until a different shot is made. Destroy at least 4 ghouls to qualify the Cellar to advance to stage 3. Additional shots can be made before shooting the Cellar to destroy additional Ghouls and increase the value of the final shot.
- Stage 3: Shoot the House Entrance to finish the Haunt and score the built-up final shot value.
- Teenagers from Outer Space: (Left side of house, attic window)
- Stage 1: 250k increment. All shots except for the House are lit. Shoot any of them for the base value increasing by 50k per shot; after making a shot, it will turn off so it can’t be made again. Make 3 shots (+1 based on the number of previously completed Haunts) to advance to stage 2.
- Stage 2: The right orbit will light. Hit the right spinner (the ball does not have to make it all the way up the right orbit) for the base value plus 1% of the final shot value per spin and light the House Entrance to finish the mode. You can continue hitting the spinner to increase the value for the final shot.
- The Brain That Wouldn’t Die: (Left side of house, left garage window)
- Stage 1: 500k base value increment, 250k final shot value increment. 4 shots are lit at random, 3 pink and 1 flashing white. The pink shots increment the base value. Shoot the flashing white shot to collect the base value and advance to stage 2.
- Stage 2: 100K increment. The House Entrance is lit, shoot it for the base value and advance to stage 3.
- Stage 3: 100K increment. All shots except the House are lit. If a shot is made, it will turn off until a different shot is made. Make at least 4 shots (+1 for each previously completed Haunt) to qualify the Cellar to advance to stage 4. Additional shots can be made to increment and collect the final shot & base values before shooting the Cellar.
- Stage 4: 100K increment. Shoot the left ramp and right ramp to light the final shot at the House.
- The Manster: (Left side of house, right garage window) Unlike other Haunts, this starts with a base shot value of 500K, plus all switches are worth 10K initially. Each shot made increments the shot value by 50K and the switch value by 1K. Every switch hit also increments the final shot value by the base switch value.
- Stage 1: All shots except the House are lit. If a shot is made, it will turn off until a different shot is made. Make 5 shots to qualify the House to advance to stage 2. Additional shots can be made to increment and collect the base value before shooting the House.
- Stage 2: All shots except the House are lit. Shoot each shot to turn it off. Turn off all 6 shots to proceed to stage 3.
- Stage 3: The House is lit. Shoot it twice to proceed to stage 4.
- Stage 4: Both ramps are lit. Shoot each ramp once to light the final shot at the House.
- Manos: The Hands of Fate: (Right side of house, middle floor window)
- Stage 1: 250k increment. Shoot any of the 3 shots on the left (left orbit, left ramp, garage), then any of the 3 shots on the right (right orbit, Crypt, right ramp), then the House.
- Stage 2: 250k increment. Shoot the House 2 more times, then all shots except the House will be lit, with 5 shots flashing red/yellow and one shot lit solid red. Shoot the solid red shot to proceed to stage 3. The flashing red/yellow shots can be made for additional scoring before the solid red shot.
- Stage 3: 100k increment. The House is lit. Shoot it to light all 7 shots. If a shot is made, it will turn off until a different shot is made. Make 3 shots to qualify the Cellar to advance to stage 4. Additional shots can be made to increment and collect the base value before shooting the Cellar.
- Stage 4: 100k increment. Identical to stage 3, except shooting the Cellar will turn off all shots and light the final shot at the House.
- The Werewolf of Washington: (Right side of house, attic window)
- Stage 1: No increment. Both orbits are lit (flashing blue/cyan), shoot either orbit to “Transform” for 500k + 50k per transformation.
- Stage 2: When transformed, the Garage and Crypt are lit solid blue, and the House, left ramp, and right ramp are lit flashing blue/cyan. Shoot flashing shots to keep a combo going, with the value for each shot increasing quadratically in the length of the combo – the Nth shot in the combo is worth the base value + 125K x (N2 - N). Shooting either the Garage or Crypt or timing out the combo after shooting a flashing shot ends the transformation for the current value.
- The initial shot to start the combo has no time limit (aside from the mode timer), but after shooting a flashing shot, the next shot must be made within 7 seconds to continue the combo, with no grace period. Shooting the House keeps all 5 shots lit, while shooting the left or right ramp turns off the shot until another shot is made.
- Note: If you shoot the left orbit to transform and the ball falls in the Back Door, the spotted shot starts the 7-second combo timer.
- When the 1st or 2nd transformation ends, the base value is incremented by 125K and the mode returns to Stage 1. When the 3rd transformation ends, the final shot will be lit at the House.
Along with the six main Haunts, there are four Haunts located at the right-most window that can be selected if you’ve obtained the Skeleton Key. Each key earned unlocks one of these four Haunts. The order these Haunts are unlocked is random, except (on default settings) Dracula will always be unlocked first on October 31st, while Santa Claus will always be unlocked first during the entire month of December.
- Santa Claus Conquers the Martians
- Stage 1: 50K increment. Both ramps are lit, shoot either to advance. Then the Garage and Crypt are lit, shoot either to advance. Next, both orbits are lit, shoot either to advance to Stage 2.
- Stage 2: 50K increment. All shots except the House Entrance are initially lit green. Shooting a green shot turns it red, and shooting a red shot turns it back to green. Make 3 green shots to qualify the final shot at the Cellar. Turning all shots red before making the final shot awards an additional bonus (more info needed).
- The Giant Gila Monster:
- Stage 1: 50k increment. The House is lit along with all major shots. Shooting shots will increment the base value which is scored by shooting the House.
- Stage 2: Pop bumper mode. Collect 20 bumper hits to light the final shot at the House. The lit ramps and orbits alternate when made and score the built value + 100k increment, and increase the value for the bumpers which starts at 100k and increases by 50k per lit shot. Shoot the lit House to complete the mode and score the final shot value.
- The Satanic Rites of Dracula: (need info)
- Eegah:
- Stage 1: Shoot all major shots, then shoot the Cellar to advance.
- Stage 2: Shoot the left and right ramps (the same ramp can be hit repeatedly). Make 2 ramp shots to light the Cellar to advance to Stage 3.
- Stage 3: Shoot the loops, ramps, and the House Entrance. The same shot can be hit repeatedly. Make 6 shots to light the House Entrance to complete the mode.
Trailer Trash
This bonus round is awarded after completing any Haunt. The House Entrance will light on a hurry-up timer to award you 50% of the total amount of points you scored during the Haunt again. The value can be increased to 75% by shooting either the left or right ramp, or 100% by shooting both ramps before collecting the value at the House. If Multiball is active when a Haunt has been completed, you will still be able to play Trailer Trash during the Multiball. Progress towards Haunts and other objectives can still be made during Trailer Trash.
Note: The Atomic Raygun cannot be used on the Trailer Trash hurry-up, although it can be used on either of the ramps to boost the value.
Haunt Wizard Modes
There are two Wizard Modes that can be qualified at the House and started the same way as the normal Haunts by starting certain amounts of them. One is qualified after playing three Haunts, and the other is qualified after playing six Haunts (either the main 6 haunts, or 5 + a bonus haunt from the locked window). Starting They Came From Space is required to qualify the final wizard mode.
-
House Party: Lit after playing three Haunts. 4-ball Multiball similar to Total Annihilation from AFM, where all of the major shots are lit to score Jackpots worth 25k x the number of shots made in the previous three Haunts. After scoring a Jackpot, the shot won’t be lit again until a different shot is made. Shooting the House Entrance will score a Super Party Jackpot, which awards all of the Jackpots you’ve collected up to that point again; the turret will also be spinning when the Super Party Jackpot is available, and if you make the shot while the eyeball on the turret is facing the player, a ball will be added (this can only be done once per House Party). The Multiball ends once you return to single ball play.
-
They Came From Space: This is the second Wizard Mode after starting all 6 haunts (or 5 regular plus one of the bonus haunts). This is another Multiball haunt (6-ball), which will go through phases based on the haunts that were previously played. During each phase, shoot any 5 shots to score jackpots, with shots that were made for jackpots unlighting until other shots are hit. Collecting 5 jackpots will light the House to score a super jackpot worth the jackpot total and move on to the next phase. Repeating this process for all 6 phases will complete the mode and score 100M before single ball play resumes.
Director’s Cut
Completing Haunts advances your rank on the B-Restorator, shown above the flippers (and scores 1 million + 500k per additional rank). After advancing to rank 4, the House Entrance will light to start Director’s Cut, which takes precedence over any other behavior in the game. Starting Director’s Cut is one of seven tasks required to qualify the final wizard mode.
Director’s Cut is an extended version of Trailer Trash that allows the player to re-collect the values that were scored from each Haunt. Shoot the lit blue shots to qualify the Cellar to wrap up production on each B-Restorator film and cash out the total value. Repeat this four times, once for each mode that was completed up to this point, to complete the mode and score an 100M bonus.
Deadhead Family Crypt
Hitting the Crypt entrance enough times (1 + 1 hit for each defeated Deadhead) will allow the entrance to lower, revealing a scoop that you can shoot the ball into. A skull head will then lower, which you can shoot several times to hit the Deadhead shown on the display. After enough shots (3 + 2 more hits for each defeated Deadhead), you will be able to shoot into the Crypt one more time to finish the Deadhead off. There are 15 different Deadheads.
Defeating a Deadhead will light Return at the right outlane.
Defeating two Deadheads will light Extra Ball.
The third Deadhead will light Super Head Shot at the Crypt as the final shot, which behaves the same way as a normal final shot but requires the player to aim for the flashing target using the button. Completing the Super Head Shot is one of the requirements to qualify Wild Market Value.
Defeated Deadheads score 250k in end of ball bonus.
Freak Fryer & Gappa Angry!
Every switch hit counts towards the Freak Fryer. Reaching level 1 requires 150 switch hits and awards 1 million points, with each subsequent level requiring 25 more switch hits than the previous level and awarding 500k more:
| Level | Switch hits (per level) | Switch hits (cumulative) | Point value |
|---|---|---|---|
| 1 | 150 | 150 | 1M |
| 2 | 175 | 325 | 1.5M |
| 3 | 200 | 525 | 2M |
| 4 | 225 | 750 | 2.5M |
| 5 | 250 | 1000 | 3M |
After advancing the Freak Fryer to its maximum level, the House Entrance will light to start Gappa Angry!.
Gappa Angry! is a unique single-ball mode with several different outcomes, where you have to make flashing shots and lock balls in a specific order. The shots in each stage start at 500k, increasing by 500k per stage, and increase by 25k for each shot made during the stage. All switch hits add to a Super Jackpot that will be collected if you’re able to lock all six balls.
Make the shots and lock the balls in this order to advance through the scene, build the Jackpot and Super Jackpot values, and potentially start a 6-ball Multiball mode!
- House Entrance, then lock a ball in the House Lock
- Left and right ramps, then lock a ball in the Garage
- Left and right orbits + House Entrance, then lock a ball in the Crypt
- Left and right ramps + House Entrance + Crypt, then lock a ball in the Trunk
- Left and right orbits + left and right ramps + House Entrance, then lock another ball in the Garage
- Cellar to collect the Super Jackpot and start 6-ball Multiball!
There are also other ways to progress through the mode. Making the Back Door Skill Shot will also award you with one shot’s worth of progress through the current level, and if a ball lands in the Trunk while one is already locked (if one was locked before Gappa Angry or after level 4), then the level will instantly be completed for you, awarding all of the shot values as well.
Various modes are available if the player fails to reach the final stage of Gappa Angry!. These modes all utilize the Jackpot value that was built up during the mode and correspond to different positions on the Freak Fryer.
- Pool Party: Starts if you drain during the second stage and lasts for the rest of the ball (other modes can be started, this just runs in the background). The pop bumpers score more points than usual (250k - can this increment?), and every 20 pop bumper hits will score the Jackpot value.
- Dance Fever: 2-ball Multiball starts if you drain during the third stage. All of the Gar-Goil targets are lit to score jackpots and light the shots surrounding them for additional jackpots.
- Make-Out Mayhem: 3-ball Multiball starts if you drain during the fourth stage. The left ramp, house entrance, and Crypt are lit to score the Jackpot value.
- Scream Test: 4-ball Multiball starts if you drain during the fifth stage. The left ramp, house entrance, right ramp, and Crypt are lit. One random shot (different every wave) will score the Jackpot value, while the other three random shots will multiply the Jackpot by +1x, up to a maximum of 6x. The multiplier and shots reset and change once the Jackpot is scored.
- Run For Your Life: 5-ball Multiball starts if you drain during the sixth stage. The left orbit, left ramp, house entrance, right ramp, and right orbit are lit to score the Jackpot value. The last shot that collected a Jackpot can’t be made again until a different shot is made.
- Gappa Angry Multiball: This is the big 6-ball Multiball awarded upon making the final shot to the Cellar. The Super Jackpot will be awarded on starting this mode. Afterwards, 6-ball Multiball will start, with all shots permanently lit for the Jackpot value and super jackpots available to be collected by clearing all shots and then shooting the house.
(Need information on building the Jackpot)
Gar-Goils Gone Wild
Complete the Gar-Goil targets two times (increasing up to four times) to advance the Gar-Goil Gauge to its maximum, then complete the targets one more time to start the mode.
Each hit to a Gar-Goil target during this mode scores 50k + 10k increment, with a bonus of 150k + 25k increment for hitting all four targets. Hitting either orbit will score 150k + 150k per shot.
There is also a Super Jackpot during this mode (worth decent points, 20 million maybe?), how is this collected? According to the official Stern Insider instructions page, the orbits feature into this mode in some way.
Garage Multiballs
There are three different Multiball modes that can be started with shots to the Garage. Three balls have to be locked in order to start each Multiball. To light Locks, hit the drop target blocking the Garage a certain number of times: once for the first Multiball (which will light all of the locks), once per lock for the second Multiball, and twice per lock for the third Multiball. These Multiballs can be started during any ongoing Haunt, and are played in the following order:
- Wild Women Multiball: All major shots (except for the Garage) light for Jackpots worth 350k, increasing by 25k per Jackpot. After making all five Jackpots, the House will light to score a Super Jackpot worth 1M. Afterwards, both orbits will light for Super Jackpots for the rest of the Multiball (800k + 25k increment)
- Add-a-Zombie Multiball: The left orbit, House Entrance, Crypt, and right orbit are lit for Jackpots worth 500k, increasing by 25k per Jackpot. Making the garage shot will add a Jackpot at a random shot.
- Attic Attack Multiball: All shots are lit for Jackpots worth 500k + 25k per jackpot, with jackpot shots relighting once a different jackpot shot is made. Super jackpot is lit at the House after every 5 jackpots scored and scores the jackpot total.
Junk In The Trunk Collect “Junk” for awards and multiballs. The flashing insert initially cycles through all 4 pieces of Junk, hit any of the Trunk Targets (36-24-36) to lock in the Junk item, then complete the Trunk Targets to light the Trunk, then shoot the left Ramp when lit to collect the selected Junk item and lock a ball. Worth noting - if a ball happens to fall into the lock under the Trunk, it will be locked even though you didn’t shoot the ramp. This will also award a piece of Junk and progress you towards Junk in the Trunk Multiball. Junk Items are…
- Skeleton Key - “Opens Any Door” - Unlocks a bonus Haunt
- Lab Test - “Build Monster Jackpots” - Increases jackpot values
- Elvira’s Dagger - “Slice and Dice” - Adds a bonus to each non-multiball Haunt
- Atomic Raygun - “Disintegrates Anything” - Lights action button to award a shot in the most recently started mode. The action button will be lit in the same color(s) as the shot it would spot. Cannot be used on certain awards, such as the Trailer Trash hurry-up.
Lock 2 balls to start Trunk Multiball.
Collect all the junk to qualify Phone-A-Fiend multiball.
Trunk Multiball
This is a 2-ball Multiball. Two Jackpots are lit at random shots, and a hit to any of the Trunk Targets will change the location of the lit Jackpots. Making the targets will also light the left ramp to collect a Super Jackpot and 1 - 3 (a random amount in this range) of a random piece of Junk. This Multiball can be brought into any other mode.
Phone-A-Fiend Multiball
Phone-A-Fiend Multiball is qualified by collecting at least one of all the Junk in the Trunk. Start the multiball by locking two balls in the Trunk as you did before.
Shoot the Trunk targets to light the left ramp to score a jackpot and light all major ramp and orbit shots for 20 seconds. Shoot them to score additional jackpots, then when time runs out, reset the process by shooting the Trunk targets to light the left ramp again. Each jackpot is worth 500k more than the previous.
Other Scoring
Side Modes {#heading–trailertrash}
These two modes can be advanced towards and started at any time during play, after making the required amount of shots to start them. These modes can’t be stacked on top of each other, or with Gar-Goils Gone Wild.
- Un-Happy Hour: Make 5 (+2 for each time the mode is started) shots to either ramp to start this timed mode. Shots to either ramp are worth 350k + 25k increments for 30 seconds.
- Drive Me Crazy: Make 5 (+2 for each time the mode is started) shots to either orbit to start this timed mode. Shots to either orbit are worth 300k + 25k increments for 30 seconds.
Double Trouble
Double Trouble can be a quick way to score many points. Light either inlane for Double Trouble by completing the Trunk targets and the Hand of Fate targets, then roll over the lit inlane to start 2x scoring for 30 seconds; you can extend the timer by another 10 seconds by completing either bank of targets again during the timer. Qualifying and starting Double Trouble again while the 2x timer is running will start 4x scoring and reset the timer!
Hand of Fate & Manos Wheel
The Hand of Fate is lit at the left outlane by completing the right target bank. When triggered by losing the ball down the left outlane, the player is presented with a spinning wheel on the display which they must stop by hitting the lock down bar action button.
The wheel has 6 segments, each containing a different award. The player is awarded the item the wheel is stopped on and the award is replaced with a portion of the image behind the awards. When all awards are collected (and the image is complete), Manos Wheel will start.
No award is collected if the player does not stop the wheel (after 6 seconds) or if the wheel is stopped on an already collected award. Note that the Hand of Fate may be triggered during a multiball. Hand of Fate can still be collected if a ball save is active.
The awards are:
- Ball Save (can’t be chosen if Ball Save is already active)
- Extend Garage Multiball
- Extend Trunk Multiball
- 5 Million
- 2 Million
- Double Bone-Us (doubles entire bonus, on top of any multipliers!)
The second wheel:
- Extra Ball
- Special (credit on factory settings)
- 5 Million
- 2 Million
- Double Bone-Us
- ? (currently unknown)
The third wheel:
- 5 Million (two spots on the wheel)
- 2 Million (two spots on the wheel)
- Double Bone-Us
- ?
Manos Wheel will start after all awards have been collected once. A smaller wheel will start spinning on the display, with six slots corresponding to different point values (250k, 500k, 750k, 1M, 2M, 5M). Hitting any of the Hand of Fate targets will both collect the value and add that value to a Jackpot that can be collected at the left outlane. The mode ends when either the Jackpot is collected or the ball drains; however, the mode will still be available to start if you don’t collect anything off of the Manos Wheel before draining.
Return (Outlane Ball Save)
This is the right outlane ball save lit by defeating a Deadhead.
Extra Balls
Extra Balls are lit to collect at the House by…
- Completing two Haunts
- Defeating two Deadheads
End of Ball Bonus
Bonus is determined by:
- Deadheads (250k per killed Deadhead, held from ball to ball)
- Haunt Shots (5k per Haunt Shot)
- Base value (how is this determined?)
x Bonus Multiplier (x Double Bone-Us if applicable)
Wild Market Value
This is a final wizard mode where you get to sell the house for a value built up during the game by hitting the wild market value spot target. Once lit this mode is started at the cellar and starts a 30 second hurry-up to hit the wild market value spot target and sell the house.
These are the requirements to light this mode:
- Start DIRECTOR’S CUT.
- Banish Clown deadhead (SUPER HEAD SHOT).
- Start PHONE-A-FIEND multiball.
- Start GAPPA ANGRY.
- Start GAR-GOILS GONE WILD.
- Start ATTIC ATTACK multiball.
- Start THEY CAME FROM SPACE.