TMNT
- Game Information
- Rules Overview
- Layout
- Modes of Play
- Turtle Select
- Skill Shots
- Episodes
- Multiball Modes
- Other Features and Scoring
- Wizard Modes
Game Information:
- Lead Designer: John Borg
- Code/Rules: Dwight Sullivan
- Artwork: Zombie Yeti
- Display and Animations: Joshua Clay
- Music and Sound: Jerry Thompson
- Release Date: June 2020
- Wiki Rulesheet based on Code Rev: 1.50
- Edit the Code revision, if applicable, when you make changes
Based on the ’80s and ’90s cartoon version of the long-running franchise, each player picks one of the four turtles at the start of the game, each of which comes with their own special benefits. The primary goal of the game is to complete eight Episodes and fight the turtles’ rogues gallery, with the Shredder and his army of Foot Soldiers being the ultimate goal. Along the way, the player will have the opportunity to level up their turtle’s perks through Training Modes, customize the rules of Ninja Pizza Multiball through pizza toppings, and put their button mashing skills to the test during a Pizza Party. Those with high enough skills may even be able to start the “Cowabunga Multiball”.
Rules Overview:
- Choose your Turtle, each one has different Perks. The first Perk starts lit but later ones are earned by leveling up through Training Modes.
- Shoot left and right ramp to light Start Episode at the Pizza Parlor. Shoot it to start an Episode.
- Play 4 Episodes to light Team-Up Multiball and re-enable your two main multiballs.
- Play 8 Episodes to light Final Battle.
- Shoot the Pizza Parlor three times for Ninja Pizza Multiball.
- Shoot the right ramp four times (or choose Donatello at the start of the game) to light Turtle Power Multiball.
- Spell LAIR at the LAIR Target to light Training at the LAIR Lane (under flipper shot), completing your 1st Training Mode will boost scoring by 10%, enable your next Turtle Perk, and light Neutrino Pizza Party.
- Spell LAIR a 2nd time to light start 2x Playfield at the 2X Target up the middle.
Quick Strategy Guide:
- Stack Episodes with either main multiball, try and play through 4 Episodes to get to Team-Up Multiball and re-light your main multiballs.
- Get the 2x Playfield running, keep it running by shooting the 2X PF Target periodically. Use multiball and ball save to safely light the 2X PF.
- During either multiball, shoot enough shots to light the Upper Flipper Krang Loop shot, shoot the loop when lit to light the LAIR Lane shot for Super Jackpot, repeat.
- If Training is lit, it’s worth playing in order to enable Neutrino Pizza Party which can be very valuable, though it is a single ball mode.
Layout:
| Premium/LE: | Pro: |
|---|---|
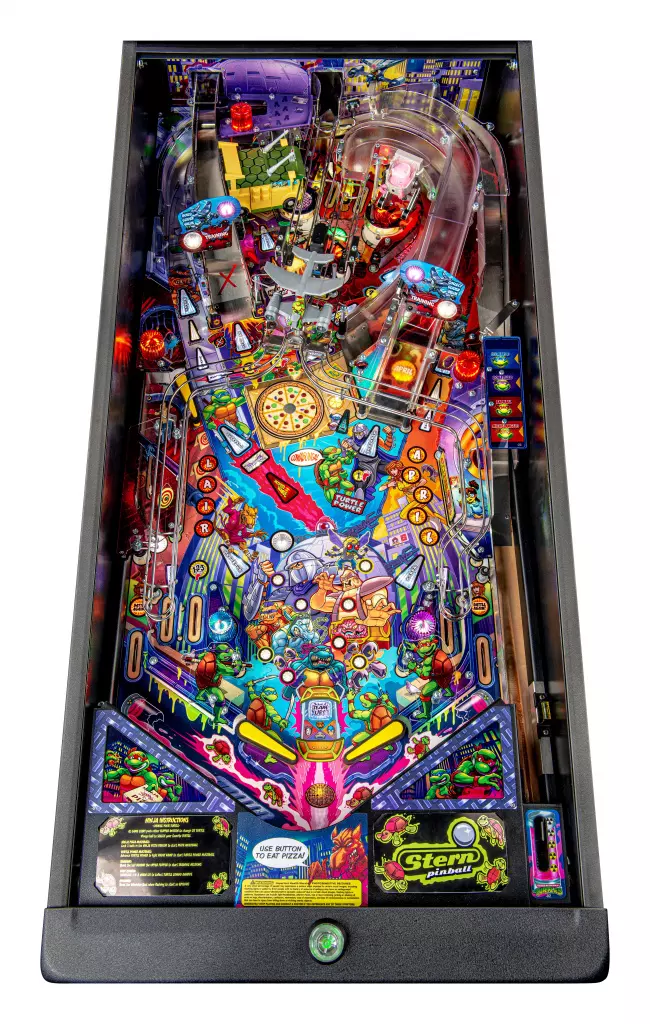 |
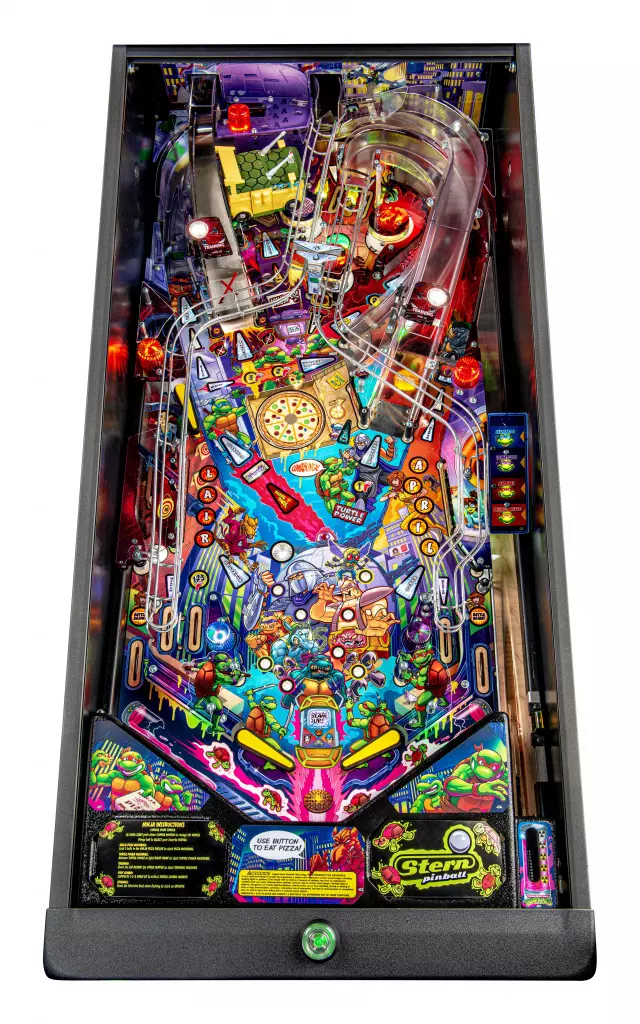 |
Modes of Play:
These modes are accessible by holding both flipper buttons during attract mode until a menu appears. The following options are available:
- Standard See below for full rulesheet.
- Competition Same as Standard but with elements of randomness removed.
- Cooperation Shared progress between all players. Also includes a unique, shared Weapon Hurry-Up feature.
- Cooperation and Competition Same as Cooperation but with elements of randomness removed.
- Impossible Play:
Game set to Very Hard:
- No ball save or extra balls.
- Multiballs harder to light.
- Multiball ball save shortened.
- ~2.5 seconds of hold time per flip before flipper releases. Hold time recharges when flippers are not flipped.
- Monster Play: In a multiplayer game, player one is the “Monster” and plays with Impossible Play rules. All other players are set to Standard Play.
- Team Play 2 VS 1, 2 VS 2, or 3 VS 1 Each team combines their points, but they DO NOT share progress.
- Final Battle Challenge In this challenge mode you play the final episode: Portal in the Park/Final Battle. The scores for Final Battle Challenge are kept on a separate leaderboard. The rules appear to be mostly identical to those in a standard game but possibly with a more generous ball save timer. See below for full episode details.
- Half Shell Challenge: In this challenge mode, you attempt to get each of the turtles back to the LAIR one at a time by shooting 3 lit (whatever color the current turtle is) shots. Shooting 2 green shots will spot the leftmost lit shot. After collecting the 3 lit shots, all 4 Turtle Shots will light, shoot any one to finish that turtle and move onto the next one. Once you’ve completed Michelangelo, the mode is over. There is a timer that tracks how long it takes to complete this challenge and a high score table to go along with it.
- DJ Mixer NOT a gameplay mode. This mode operates like a Jukebox, allowing you to play the music featured in the machine, including a number of specific playlists.
Turtle Select and Levels: At the beginning of the game, you select one of the 4 turtles. Each turtle has their own set of perks awarded by leveling up through the Training mode, and a certain shot that lights for their skill shot award. The turtles’ levels are reset at the end of the game unless the player has an Insider Connected account, in which case they will be saved between games. You start at level 1 and therefore receive that perk at the start of the game.
| Turtle | Corresponding Shot | Level 1 | Level 2 | Level 3 | Level 4 |
|---|---|---|---|---|---|
| Leonardo (Well-Trained Leader) | Lair | Light Training | +10 Seconds to All Timers | 2x Weapon Hurry-Up | 2x Team-Up Multiball and Pizza Party (Victory Laps) |
| Raphael (Cool But Rude Bruiser) | Left Ramp | Light Start Episode | 2x Krang Kombo | Increase Playfield Multiplier (to 3x) | 3x Episode scoring (shots and completion bonus) |
| Michelangelo (Pizza-Loving Party Dude) | Pizza Parlor | Light Battle Again & +5 Pizza Slices | 2x April Hurry-Up | 2x Pizza Eating Contest | 3x Ninja Pizza Multiball |
| Donatello (Glider-Flying Tech Wiz) | Center Ramp | Light Turtle Power Multiball | 2x 1-2-3 Foot | +10 Seconds to All Ball Saves | 3x Turtle Power Multiball |
Note: Not sure where else to put this but I figure it’s worth noting, Raphael’s 3x PF and 3x Episodes are multiplicative and will boost your episode scoring (shots and completion bonus) by 9x (10.7x when you also consider the +30% Training Boost)!
Skill Shots:
- (Pro only) Plunging into the flashing top lane (always the one on the right) increases the bonus multiplier by +1x. Hold the left flipper if you want the ball to pass through the orbit and go right to the upper flipper.
- When you plunge the ball, a 15 second timer will activate to shoot the lit shot that corresponds to your selected turtle. If you went for the above skill shot, the timer doesn’t begin until after the ball exits the pops. Making the skill shot scores + 250k per skill shot and lights the Weapon insert on the right or left inlane for Weapon Hurry-Up. The skill shot only disappears when the timer runs out.
Episodes:
Shredder has devised a cross-dimensional device that could spell doom for the Turtles. The turtles’ adventures take them everywhere from the streets of New York to the decrepit world of Dimension X, all the while taking on and defeating villains.
There are eight Episodes that can be started during the game, each corresponding to a different villain; most can be played in any order though some can only be played after an earlier episode has been played, whether won or lost.
Lighting and Starting an Episode Light Start Episode by shooting the left and right ramps, then shoot the pizza parlor to start the episode. Each episode has an insert on the playfield that flashes when it is the next one to start, and this insert can be changed via the Dimension X standup targets (left target goes up the icon list on the display’s far-right column, and the right target goes down the list). Starting an episode re-enables the LAIR and APRIL targets if they are locked out (cycling the letter inserts), and completing an episode adds a specific perk to the Team-Up Multiball mini-wizard mode.
- Start 2 episodes: lights an extra ball
- Play 4 episodes: Lights Team-Up Multiball at the left ramp
- Play 8 episodes: Lights Final Battle at the left ramp
General Episode Information: Episodes are typically timed, starting with 30 seconds and adding time by shooting certain lit episode shots. In order to complete an episode, you need to shoot a certain set of shots to light the Turtle Shots, shooting one of these multi-color flashing shots will award the Completion Bonus and complete the episode. Completed episode icons will have a green bar next to them on the display. Played episodes display in color. Unplayed episodes are grayed out.
When you start an episode you are awarded Episode Start Points. For episodes 1 through 6 this value starts at 275k and increases by 25k for every episode you’ve played; for episodes 7 and 8 this value seems to be boosted by 100k (375k).
#### Episode Scoring: While each episode has its own unique rules, lit shots, and scoring quirks; there is a Typical Shot Value Progression (TSVP™) that starts at 100k, and increases by 10k, then by 10.5k, 11k, 11.5k, etc. Some episodes include exceptions to the TSVP™ as noted below. In addition, there is an Episode Completion Shot Increase of +25k for each episode completed, so 25k is added to a shot’s base value before applying any multiplier. This appears to also apply to other episode shots that do not follow the TSVP™, though there is at least one exception.
(The Max base episode totals listed below include the Episode Start Points, the value of most episode shots and the Completion Bonus, but do not include Playfield Multipliers, Training-related 10-30% scoring boosts, Episode Start Points for episodes that have been played, or the Episode Completion Shot Increase for any completed episodes. So these episodes can end up scoring significantly higher when stacking those things alongside them. They are primarily included to show the relative value of individual episodes.)
Episode 1: Pizza-o-Meter
- Left-side playfield insert on Shredder’s chest
- TUMB Perk: 2x scoring during Pizza Party (Victory Laps)
- Episode Start Points: 275k
- Completion Bonus: 1M
- Max base episode total: 2.035M
All major shots (Left Orbit, Left Ramp, Krang Loop, Center Ramp, Right Ramp, Right Orbit) are lit and unlight when shot. Shoot 3 lit shots to light the Turtle Shots, though you can shoot all 6 lit shots if 2 of your first 3 shots are the Left Ramp and the Center Ramp, this will leave 3 non-Turtle Shots available while the Turtle Shots are also lit to complete the episode. The shot values follow the TSVP™.
Episode 2: Window Shopping
- Left-side playfield insert, at Bebop and Rock Steady’s elbows
- TUMB Perk: Either orbit will complete both Bebop and Rocksteady orbit shots
- Episode Start Points: 275k
- Completion Bonus: 1M
- Max base episode total: Appears to be no practical cap on scoring, just the episode’s time limit and the number of shots you can shoot.
Both orbits are lit and stay lit when shot. Shoot 3 total shots to either orbit to light the Turtle Shots. The first 2 shots appear to add 10 seconds to the episode timer. However, both orbits remain lit alongside the Turtle Shots for additional points. The shot values follow the TSVP™ but yellow shots score 1x this value, orange shots score 2x this value, the 1st red shot scores 3x this value, and subsequent red shots will continue to increase this shot multiplier. Both orbits advance the base value, but each orbit has its own shot multiplier.
Episode 3: I Want a Body
- Right-side playfield insert, touching Krang’s brain
- TUMB Perk: Rescue Phase will light any un-rescued Turtle to be rescued (Note: There is currently a bug that makes your 1st Rescue Hurry-Up completion complete the entire Rescue Phase, hopefully it will be fixed in the next code update.)
- Episode Start Points: 275k
- Completion Bonus: 1M
- Max base episode total: 1.88M
Both ramps start lit, shooting a lit shot will unlight it and light the ramp or the orbit on the other side of the playfield, the ramp takes priority but if it’s already lit, the orbit will be lit instead. Shoot 4 lit shots to light Turtle Shots. Shots follow the TSVP™ and it is possible to shoot 5 total lit shots, as long as the lit shot that you don’t shoot as your 4th shot is NOT the left ramp. Basically, if the Left Ramp is lit for your 4th shot, shoot it and the other shot will remain lit for additional points.
Episode 4: Night of the Mousers
- Right-side playfield insert, on the Mousers (below Krang)
- TUMB Perk: Flippers will change lit weapon inlane, lit lane will spot a Bad Guy shot
- Episode Start Points: 275k
- Completion Bonus: 1M
- Max base episode total: 2.425M
The LAIR Target, Left Ramp, Right Ramp and APRIL Target start lit; shooting a lit shot will then light those shots along with the center ramp and both orbits, excluding the shot you just hit. This continues for the remainder of the episode. There is no timer for the episode, but each of the shots can time out. If 10 shots time out, you fail the episode. Shoot 6 lit shots to light the Turtle Shots, there is no timer during the Turtle Shots phase but there are no additional shots to shoot. During the episode, any shots to the LAIR Target, Left Ramp, Right Ramp, and APRIL Target will follow the TSVP™, the orbits always score 150k, and the Center Ramp always scores 250k. The orbits and Center Ramp are also subject to the Episode Completion Shot Increase.
Episode 5: See You On The Other Side Ray
- Left-side playfield insert, at Shredder’s fist
- TUMB Perk: Doubles Rescue Hurry-Up start value from 500k to 1M
- Episode Start Points: 275k
- Completion Bonus: 1M
- Max base episode total: 2.785M
The 3 ramps start lit, shoot a lit ramp to unlight all ramps and light the LAIR target. Shoot the LAIR Target (this can time out, unlight, and go back to lit ramps) to unlight LAIR Target and light the ramps again. Shoot the LAIR Target when lit 3 times to light Turtle Shots. The shots award the TSVP™. If the LAIR Target times out, the shot values continue to progress. It’s technically possible to shoot up to about 10 total shots, but 8 shots is probably a more realistic goal by having the LAIR Target time out twice.
Episode 6: Welcome To The Concrete Jungle
- Left-side playfield insert, at tip of Leo’s sword
- TUMB Perk: Boosts Foot Soldier and Bebop and Rocksteady shot values by 250k
- Episode Start Points: 275k
- Completion Bonus: 1M
- Max base episode total: 2.08M
This episode consists of two phases:
Phase 1: The Dimension X Targets, the Left Ramp and both Orbits start lit. Shoot both Dimension X Targets (100k each or 25k if spotted from the Left Ramp), then the Left Ramp to advance to Phase 2. You can also shoot the yellow shots at both orbits during this phase to add 10 seconds to the timer and score points (they are part of the TSVP™ along with the lit shots in Phase 2).
Phase 2: All major shots (Left Orbit, Left Ramp, Krang Loop, Center Ramp, Right Ramp, Right Orbit) are lit and unlight when shot, shoot 3 lit shots to light the Turtle Shots. The first 2 red shots will add 10 seconds to the episode timer and are also part of the TSVP™, so shooting the yellow shots in Phase 1 will increase the overall value of these as well.
Episode 7: Super Fly
- Need to play Episode 4: Night of the Mousers to unlock
- Right-side playfield insert, next to Super Fly and Krang’s android head
- TUMB Perk: Doubles Shredder Hurry-Up start value from 500k to 1m
- Episode Start Points: Approx. 375k
- Completion Bonus: A hurry-up that starts at 2.5M
- Max base episode total: TBD
The Right Ramp and Right Orbit start lit, shoot either lit shot to light Left Ramp and Left Orbit, then the Krang Loop and Center Ramp. Shooting your 3rd lit shot will light the Turtle Shots and start a hurry-up with an initial value of 2.5M, shoot a Turtle Shot to collect the hurry-up at it’s current value and complete the episode. If you don’t hit a lit shot for about 15 seconds, the APRIL Target will light, shooting it will add ~5 seconds to the episode timer and score about 100k points.
Note: Still need to determine the shot values and what it is that determines their value
Episode 8: The Wrath of Krang
- Need to play Episode 3: I Want A Body to unlock
- Right-side playfield insert, on Krang’s android body’s chest
- TUMB Perk: One Foot Soldier shot will defeat all 4 Foot Soldiers, but not Bebop and Rocksteady (both orbits)
- Episode Start Points: 375k
- Completion Bonus: 1.5M
- Max base episode total: 3.12M
The LAIR Target, LAIR Lane, Left Orbit, Left Ramp, Krang Loop, Center Ramp, Right Ramp, Right Orbit, APRIL Target will be lit yellow or red. Two adjacent red shots will cycle from left to right and then right to left, all other included shots will be lit yellow. The yellow “Krang Missed” shots score 25k, the 1st red shot is worth 296k, 2nd shot: 416k, and 3rd shot: 458k. Shoot 3 red shots to light Turtle Shots.
Note: Need to determine if the “Krang Missed” 25k shots are boosted by the Episode Completion Shot Increase, if they are, shooting all yellow shots might be worth shooting later in a game otherwise they are probably worth avoiding.
Multiball Modes:
These two multiball modes are available at the start of the game. After they have been played, one of the wizard modes must be played to re-enable them.
Turtle Power Multiball: Shoot the right ramp during normal play to advance towards Turtle Power Multiball. After three right ramp shots, the next right ramp shot will begin Turtle Power Multiball. (Donatello’s level 1 perk lights it instantly, too.)
During Turtle Power Multiball, shoot the green shots for jackpots, starting at 100k +25k for each additional shot, maxing out at 250k. Collect 4 jackpots to light Mondo Jackpot at the upper loop shot – repeated upper loop shots score Double, then Triple Mondo Jackpot. Mondo Jackpot also lights the Lair for Jackpoto Grande/Super Jackpot. See values in the Mondo Jackpots and Jackpoto Grande Values section. Green shots re-light and the Mondo Jackpot can be qualified with four more green shot jackpots after collecting Jackpoto Grande/Super Jackpot.
Shoot all 4 Turtle Shots to light “Turtle Power” flashing for an Add-A-Ball at the Right Ramp, and re-light all of the Turtle Shots – these also count as jackpots. There is no limit on the number of Add-A-Balls, but obviously there is a limit on the number of balls that can be in play.
Ninja Pizza Multiball:
Shoot the Ninja Pizza Parlor three times during single-ball play to lock balls and start Ninja Pizza Multiball. At the start of multiball, a list of perks is seen based on the toppings the player collected while locking balls (read more below), and the three balls are released from the pizza parlor onto the spinning disc to start multiball.
Shoot lit shots to defeat Foot Soliders, each shot defeats a different number of Foot Soldiers:
- Left Ramp: 3 Foot
- Pizza Parlor: 1 Foot
- Krang Loop: 2 Foot
- Center Ramp: 2 Foot
- Right Ramp: 1 Foot
Defeat 6 Foot Soldiers to light Mondo Jackpot at the Krang Loop - repeated shots score Double, then Triple Mondo Jackpot. Collecting Mondo Jackpot also lights the Lair for Jackpoto Grande/Super Jackpot based on the value of all shots collected prior. Pizza Target “Jackpots” can also be scored for small points and to collect pizza slices during this multiball.
Pizza Toppings can be viewed at the top-right of the display, and are changed from left to right via shots to the 2 Pizza Targets during normal play; the first two are locked in with the first ball lock, the third and fourth with the second ball lock, and the fifth with the third. Multiples of certain toppings can be collected and affect the multiball accordingly. The toppings that can be collected are as eclectic as the turtles themselves, and are:
| Perks | Text | Details | Notes |
|---|---|---|---|
| Anchovies | Slices Eaten +10k | Pizza Target Jackpots are worth an additional 10k | |
| Octopus | Pizza Frenzy | All switches score points starting at 1k per switch, increasing based on some number of switch hits, maxes out at 8k per switch | |
| Peanut Butter | +1 Slices Eaten | Pizza Target Jackpots award an additional Pizza Slice | |
| Pepperoni | Jackpots +250k | Single Mondo Jackpots are worth an additional 250k points | This doesn’t affect Double or Triple Mondo Jackpots |
| Fudge | +1 Foot Kills | Foot Soldier Shots will defeat an additional Foot Soldier | Display does not reflect actual number of Foot Soldiers defeated |
| Sausages | +50k Per Foot Kill | Each Foot Solider defeated will be worth an additional 50k | |
| Gummy Bears | +1 Ball | Adds an additional ball to the multiball | Can add up to 3 on the Pro and 5 on the Prem/LE |
| Ice Cream | Jackpot Starts Lit | Mondo Jackpot is lit at the start of multiball | |
| Pineapple | Parlor Spots +1 Foot | The Pizza Parlor shot will defeat an additional Foot Soldier when lit | Functions like Fudge but only on the Parlor. The animation doesn’t reflect the proper number of Foot killed, but it works correctly |
| Marshmallows | Unlimited [Triple Mondo] Jackpots | Collecting a Triple Mondo Jackpot will NOT un-light it, allowing you to repeatedly collect it at an increasing value and reset the timer. | Mondo Jackpots can still time out if you take too long to collect another one |
| Chili Peppers | Super Starts Lit | Jackpoto Grande is lit at the start of multiball | |
| Mushrooms (Prem/LE only) | Timed Lock | Lair Lane will hold a ball and start a timed 2x scoring multiplier |
Mondo Jackpots and Jackpoto Grande Values:
In both of the main multiballs, Mondo Jackpots and Jackpoto Grande/Super Jackpot are available. Mondo Jackpot is lit (white) at the Upper Loop by shooting enough shots (4 green shots for TPMB and defeating 6 Foot Soldiers for NPMB) and Jackpoto Grande/Super Jackpot is lit at the under-flipper shot by collecting a Mondo Jackpot. Collecting a Mondo Jackpot will also light a Double Mondo Jackpot (blue), collecting a Double Mondo Jackpot will light a Triple Mondo Jackpot (red). Both Double and Triple Mondo Jackpots are on a timer and will time out if not hit.
Mondo Jackpot Values:
- Ninja Pizza Mondo Jackpot = 500K base (+250K)
- Turtle Power Mondo Jackpot = 350K base (+50K)… but there’s currently a bug where your first TPMB enjoys the 2x value for Mondo that’s supposed to be reserved for your 2nd TPMB, so 700K base.
Super Jackpot Values:
- NPMB = 3M + 500K per Mondo since last Super
- TPMB = 500K (+125K), multiplied by the number of Supers collected (max of 3x)… though the bug still applies to Supers as well, so first Super is currently 1M (500K x2)
Other Features and Scoring:
Pict-O-Pops:
Each hit to an individual pop bumper will change which Pict-O-Pops award that pop bumper has lit, the awards’ pictures are broken into 3 tiles, each corresponding to each pop bumper. When 2 of these tiles match, the award will be locked in and all 3 pop bumpers will continue to cycle through the remaining tile until it matches the 2 locked in tiles and give that award. Then it will repeat the process.
Possible awards include:
- Add-A-Ball (during multiball)
- “Big Points” (100k)
- “Really Big Points” (300k)
- Start April Hurry-Up
- Increase April Hurry-Up
- Increase Weapon Hurry-Up Value
- Light 1-2-3 Foot
- “Add Time” (+10 seconds, if a timer is active)
- Light Battle Again
- Light Extra Ball
- Light Start Episode
- Light Turtle Power
- Light Weapon
- +1x, +2x, or +3x Bonus Multiplier
- Bonus Held
- Special
Weapon Hurry-Ups:
After successfully making a skill shot, one of the inlanes will have its “Weapon” insert lit. Roll over the lit Weapon inlane, which toggles with the flippers, to start a hurry-up with a base value of 500k at one of the orbits. Shoot the lit orbit to collect the hurry-up and light the center ramp for another hurry-up worth the base value + the first shot collect value. The value of the hurry-up bottoms out at 50k before timing out entirely. The base value of the hurry-up can be increased by 125k from the Pict-o-Pops, this applies to the base value of the first and second shots.
In Co-op mode, the total number of Weapon Hurry-Up shots increases for each Weapon Hurry-Up qualified by previous teammates on the same number ball, they don’t need to be started or completed. So if Player 1 qualifies WHU on Ball 1, Player 2 could potential qualify WHU, start it, complete it, and then complete it again. If the first 3 players qualified WHU on the same number ball, Player 4 could potentially qualify it themselves, start it, and then collect it 4 times for some decent points! The points for the Co-op Weapon Hurry-Up build the same as during standard play, each subsequent shot is worth the base value of 500k + the previous shot’s collect value. So, in theory, it is possible to collect 500k > 1M > 1.5M > 2M > 2.5M > 3M > 3.5M > 4M for a total of 18M points.
1-2-3 Foot:
At the start of each ball, the inner left inlane is lit to start 1-2-3 Foot. As soon as the ball rolls through this inlane during single-ball play, 1-2-3 Foot will start. Follow the lit 1-2-3 inserts to complete the combo; either right ramp - center ramp - left ramp, or right ramp - upper loop - center ramp will complete the sequence. The player has 15 seconds to make each shot, though 1-2-3 Foot shots that have already been made will also add time. So if time is running low, hitting the right ramp to keep it going is a good option.
The “Foot Value” starts at 50k, increasing by 1k for every spinner spin, the current value can be seen in the top left area of the display. The first shot of the combo is worth 1x the Foot Value, the second shot is worth 2x, and the 3rd shot is worth 3x, for a total of a 6x Foot Value for completing 1-2-3 Foot. Completing it will also prevent 1-2-3 Foot from being lit at the start of any remaining balls. Each shot also adds to the “Foot Defeated” counter in bonus.
Note: 1-2-3 Foot can also be re-lit as a Pict-O-Pops award. (Can it re-light this way if you’ve completed it?)
Training:
Every odd-numbered LAIR target completion lights the Lair Lane for Training, if Training is already lit, the 2x Target will be lit to start 2x playfield scoring instead. These difficult, timed modes are tough but quite rewarding as they increase all scoring by +10% for the rest of the game once won (up to +30% scoring), qualify Neutrino Pizza Party, and are the only way to level up your selected Ninja Turtle. If the LAIR Target isn’t lit (L-A-I-R inserts cycling), it must be re-enabled by starting an episode.
Training Modes are timed, starting with 15 seconds and the LAIR Target will add 10 seconds to the timer to a max of 20 seconds (this max might be higher), other targets make a sound like they are subtracting time but only flash the red G.I. and stress you out. Each Training Mode has a set of shots that must be made in order:
- Training Mode 1 (to Level 2): Right Ramp, Left Ramp
- Training Mode 2 (to Level 3): Right Ramp, Right Orbit, Left Orbit, Left Ramp
- Training Mode 3 (to Level 4): Right Ramp, Krang Loop, Center Ramp, Left Ramp
Note: If your Left Ramp is lit to qualify “Start Episode” prior to starting the Training Mode, shooting the Left Ramp to complete your the mode will qualify it for “Start Episode” as well.
Neutrino Pizza Party:
After completing a Training Mode, during normal play, completing the two Dimension X Targets before they time out will light the Left Ramp to start Neutrino Pizza Party. Progress towards completing the targets can still be made in other modes even if they aren’t seen flashing. (Will it still award progress? Or is it just able to time out?) You can only play Neutrino Pizza Party once per game.
Neutrino Pizza Party is a single-ball mode, and starts with a set 30-second timer. During the mode, 1 shot is lit blue for 350K (left orbit, then left ramp, right ramp, right orbit, repeat) and the rest of the shots are lit red. Shooting the red shots will unlight that shot and build the value of all future blue shots by 200K (+100K) up to a cap of 5M. Shooting the blue shot will collect its value and reset the mode timer to nearly 30 seconds (seems like one less second for each reset). The blue shot value never resets. When time runs out or the player drains, the mode ends.
2x Playfield:
Every even-numbered LAIR Target completion lights the center target to start 30 seconds of 2x playfield scoring. Shoot the center target while 2x playfield is running to add 5 seconds to the timer. (2x playfield can be increased to 3x playfield from Raphael’s level 3 perk.) If the LAIR Target isn’t enabled, it must be re-enabled by starting an episode.
Pizza Eating Contest:
Pizza slices can be scored in several ways throughout the game - 5 are spotted at the start of the game if you’re playing as Michelangelo, and shots to the Pizza Targets either during normal play or during Ninja Pizza Multiball will add slices. After collecting 7 pizza slices, the lights will dim and the Pizza Targets will start strobing - shoot either target at this time to begin the Pizza Eating Contest. Time to mash that action button, as you have 6 seconds to collect up to 40 more pizza slices - 1 slice per action button press. The faster you collect them, the higher the value scored will be, usually around 2 to 3 million points!
Pizza slices also count up towards several other awards, points after certain thresholds and a lit extra ball after around 60 or so pizza slices.
Krang Kombo:
Repeatedly make shots to the upper loop to increase the Krang Kombo value, then shoot the center ramp to cash the value out. The Kombo value maxes out at 500k (with three upper loop shots before timing out), and collecting a Max Krang Kombo is required to qualify the Cowabunga Wizard Mode.
Glider (Prem / LE Exclusive):
On the Prem/LE, by using the player-controlled diverter, you can shoot the Left Ramp repeatedly to “Build Glider Value,” after a certain number of shots (3? or what is max?) you will max out the Glider Value. Shooting the Right Ramp when “Collect Glider Value” is lit will collect it at its current value.
Note: More Information needed: values, when lit, etc.
Battle Again:
Every odd-numbered APRIL target completion lights one of the outlanes for “Battle Again” ball save. If “Battle Again” is already lit when a completion would normally award it, it will instead start an April Hurry-Up. The lit outlane will alternate with slingshot hits (Game Adjustment #18 can instead allow the lit outlane to alternate with the flipper buttons). If the APRIL Target isn’t enabled, it must be re-enabled by starting an episode.
April Hurry-Up:
Every even-numbered APRIL Target completion lights the Right Ramp for April Hurry-Up. Shoot the APRIL Target when the hurry-up is running to increase the value by an additional 62% the first time and add time (shooting the APRIL Target will continue to add time by adding to the value but won’t increase past the boosted 162% value), and shoot the Right Ramp to cash it out. If the APRIL Target isn’t enabled, it must be re-enabled by starting an episode.
April Hurry-Up starts at 100k; this value can be increased by 75k from the “Increase April Hurry-Up” Pict-O-Pops award, and will be increased by the following amounts if the hurry-up is started during the following features:
- Episodes - +250k
- Turtle Power Multiball - +500k
- Ninja Pizza Multiball - +500k
- Team-Up Multiball - +1M
- Final Battle - +2.5M
- Cowabunga - +5M
Extra Balls:
Extra balls can be lit at the pizza parlor from:
- Starting two Episodes
- Collecting enough pizza slices
- Percentage-based Pict-O-Pops award
End-of-Ball Bonus:
Bonus is determined through:
- Base bonus (switch hits, etc.)
- Foot defeated (either through 1-2-3 Foot or during Ninja Pizza Multiball) * 10k points
- Pizza slices * 500 points
- Episodes completed x * 125k points
All multiplied by the bonus multiplier, which increases by +1x through top lane completions and as a Pict-O-Pops award
Wizard Modes:
Team-Up Multiball:
After playing any 4 episodes, Team-Up Multiball will be lit at the Left Ramp. Depending on the turtle the player selected, the player will have to make different Turtle Shots to rescue them from the Bad Guys’ clutches. Each turtle also teams up with a different ally.
Each completed episode provides the following perks for the multiball: |Episode|Perk|Details|Notes| |—|—|—|—| |Pizza-O-Meter|2x Pizza Party|2x scoring during Pizza Party|| |Window Shopping|Bebop Spots Rocksteady|Either orbit will complete both Bebop and Rocksteady orbit shots|Also scores the points for both| |I Want A Body|Rescue Any|Rescue Phase will light any un-rescued turtle to be rescued|Fixed in update 1.55, Old Bug/Exploit: [Bug Note: as of 1.54 if you rescue one turtle it rescues all and moves onto Pizza Party. Can’t test on current code.]| |Night of the Mousers|Lit Return Lane Spots Bad Guys|Flippers will change lit Weapon Inlane, rolling over lit lane will spot a Bad Guy shot|Functions the same as a lit Weapon at the orbits or Center Ramp| |See You On The Other Side Ray|2x Rescue Hurry-Up Value|Doubles Rescue Hurry-Up start value|| |Welcome to the Concrete Jungle|+250k Bad Guys|Boosts Foot Soldier and Bebop and Rocksteady shot values by 250k|| |Super Fly|2x Shredder Hurry-Up Value|Doubles Shredder Hurry-Up start value|| |The Wrath of Krang|One Bad Guy Shot Defeats All|One Foot Soldier shot will defeat all 4 Foot Soldiers, but not the Bebop and Rocksteady shots (orbits)||
Rescue Phase:
Ball save is active for 20 seconds (by default). 6 shots will be lit to defeat “Bad Guys:” both orbits for Bebop and Rocksteady and the ramps and the Krang Loop for Foot Soldiers. Shooting a Bad Guy will defeat them and unlight that shot. Defeat all 6 Bad Guys to start a Rescue Hurry-Up at one of the Turtle Shots, starting at 500k points. Shoot a lit Turtle Shot to collect the hurry-up value and add-a-ball. Repeat this process to collect the 2nd Rescue Hurry-Up, then repeat it again to start a Shredder Hurry-Up at the Right Ramp, collect this hurry-up to light the final Rescue Hurry-Up. If a Rescue Hurry-Up times out, you need to (or get to, if you are looking to maximize points) defeat the 6 Bad Guys to start it again.
- Shot Value: The Bebop and Rocksteady shots start at 500k and increase by 25k for each lit one defeated (not sure what the cap is). The Foot Soldier shots start at 125k and increase by 75k for each lit one defeated, up to a max of 1m per Foot Solider defeated. Rescue Hurry-ups and Shredder Hurry-ups all start at 500k and count down to 50k before timing out and relighting the Bad Guy shots.
- By timing out your Rescue Hurry-Ups and continuing to defeat Bad Guys, you can start scoring pretty good points, as long as you keep the multiball going. A full set of Bad Guys is worth 1.975m the first time, 2nd time: 3.275m, 3rd: 4.575m, 4th: 5.325m, 5th and on: around 5.5m+.
- Weapons (spot Bad Guy shots) Shooting either orbit or the Center Ramp, whether lit for a Bad Guy or not, will light the weapon insert on that shot on a timer. Lit weapon shots will spot one of the Bad Guy shots, it can spot the Bebop and Rocksteady shots or Foot Soliders, and it appears that it may choose whichever shot is a lower value.
Completing all 3 Rescue Hurry-Ups will start Pizza Party (Victory Laps) and, if needed, award one of 6 requirements for the final Cowabunga wizard mode (in the order listed in the section, from top to bottom, and not including Final Battle).
Pizza Party Phase:
Shooting a lit yellow shot will collect the “next award,” as indicated on the display, then be lit red/yellow to collect 2x the “next award.” The 2x shot can time out if not hit. Pizza Party will continue until you drain down to 1 ball. The “next award” starts at 150k, each lit shot will increase the shot value by 25k up to a max of 1m.
Huge Scoring Opportunity with Leonardo and Raphael (to a lesser extent)
It is possible to play TUMB as Leonardo with “4x scoring” (5.2x scoring including the +30% Training Boost you get from being at Level 4) by having your Level 4 perk and 2x PF running. But even more interesting, if you start the Pizza Party (Victory Laps) phase and have the Pizza-O-Meter (2x Pizza Party) perk, you can have 8x scoring going (really 10.4X scoring when including the 30% Training Boost).This would allow you to shoot yellow shots worth 10.4x the typical “next award” value and even better, the 2x red/yellow shots would be worth 20.8x the “next award” value. The base value of the “next award” caps at 1m so, in theory, you could eventually start alternating between 10.4m and 20.8m shots. It would only take 35 yellow or red/yellow shots to build the base “next award” value up to that. But even after like 15 shots, you could be alternating between 4m and 8m shots.
Raphael can do a similar thing in Pizza Party (Victory Laps) with “6x scoring” (7.2x scoring with 20% Training Boost or 7.8x scoring with 30% Training Boost). It’s obviously not as large of a multiplier as Leonardo, but it involves 1 less Training Mode and Raphael is an overall better turtle to play as.
Note: This is significantly easier to do with the saved Turtle Levels enabled by Insider Connected.
Final Battle:
Final Battle is qualified at the pizza parlor after playing all 8 episodes. At the start of the mode, points are awarded for each completed episode. 250k are awarded for any failed episode, and an increasing amount of points are scored for each completed episode as follows: 500k - 1.25M - 2M - 2.75M - 3.5M - 4.25M - 5M - 5.75M. So, if you complete all 8 episodes, you will be awarded 25M points total for starting Final Battle. These points can be multiplied by 2x playfield or by Raphael’s boosted 3x playfield perk.
This episode works in phases:
-
Phase 1: Multiball - play will continue if you drain down to a single ball. The 3 ramps and the side-loop are lit. Shoot 3 lit shots, then the Dimension X targets and then the left ramp to complete phase 1. Shooting a shot will un-light it, the other 3 shots will be lit.
-
Phase 2: Single ball play. 8 shots will be lit, 4 red for Bebop and 4 blue for Rocksteady. Shoot all of the red shots to light the left orbit for a Bebop Hurry-Up, shoot all of the blue shots to light the right orbit for a Rocksteady Hurry-Up. Collect both of these hurry-ups and then shoot the left ramp to complete phase 2.
-
Phase 3: Multiball - play will continue if you drain down to a single ball. Shoot left ramp X times to defeat Slash, then shoot the side-loop X times to defeat Krang, then shoot the right ramp X times to defeat Shredder. Shoot the left ramp to win!
During any multiball phase, completing the LAIR Target will light the Lair Lane for an add-a-ball. The mode ends when the player drains all balls or makes the final Left Ramp shot.
Cowabunga Multiball:
To qualify Cowabunga Multiball:
- Collect a Max Krang Kombo
- Collect Jackpoto Grande (during either main multiball)
- Collect a Triple Mondo Jackpot (during either main multiball)
- Collect a Weapon Hurry-Up
- Collect 5 April Hurry-Ups
- Complete 1-2-3 Foot
- Play Final Battle
Need to add information about how this Wizard Mode works