Jaws
[Official Rulesheet]
- Game Information
- Rules Overview
- Layout
- Modes of Play
- Skill Shots
- Shark Encounters
- Closing the Beaches
- Bounty Hunts
- Jaws Multiballs
- Other Scoring
- Wizard Modes
Game Information & Overview:
- Lead Designer: Keith Elwin
- Code/Rules: Rick Naegele, Elizabeth Gieske
- Lead Mechanical Engineer: Harrison Drake
- Artwork: Michael Barnard
- Display and Animations:
- Sound Design: Jerry Thompson
- Release Date: January 2024
- Wiki Rulesheet based on Code Rev: 1.01
- Edit the Code revision, if applicable, when you make changes
Summer has arrived in the small New England town of Amity, and threatening sharks have put the town’s beaches in danger. The player is assigned to save the town by rescuing beachgoers, closing the beaches, and taking on bounties to defeat the invading sharks, in hopes of eventually defeating Jaws, the Great White shark himself.
Rules Overview:
- Complete the bash boat to light shark encounter modes at five different shots. Keep shooting the bash boat either during or before them for encounter boosts. Hit the blue shots to advance and complete the modes.
- To lure out the shark and start Jaws Multiball…
- Chum the water at the captive ball, then shoot the red arrows to add to the chum line.
- Once the chum line is full, shoot any yellow flashing shot, then hit the shark fin before it goes away to attach a barrel to it and light Jaws Multiball at the ramps. Play all three levels of Jaws multiball to light Smile, You Son of A… final wizard mode at the center ramp.
- Subsequent multiballs require barrels to be qualified manually at the left target bank, and more than one barrel has to be attached to the shark.
- “Beachgoers” are added to each shot with shots to the shark tower targets. Collect all three beachgoers to close the beach and start a hurry-up at that shot, and score bonuses at that shot for the rest of the game. Close all five for rescue multiball or search multiball.
- Either spin the fishing reel or shoot the right ramp to light bounty hunt, then shoot for the right ramp to start a bounty hunt for one of four sharks. Complete the indicated amount of shots on the display while playing out the rest of the game (in single-ball play, exclusively). Then, spin the fishing reel to start a multiball and take down the shark.
- Light gear at the right ramp by collecting quickshots (hit the lit harpoon lane followed by the shark fin). Each piece of gear has unique benefits and the right flipper changes the lit gear. Once all six gear pieces have been found, they can be sold for a large bonus and the final bounty hunt for the great white shark will be qualified.
- Complete the white arrows at the left target bank to light the right lane for fish finder. Shoot any of the flashing left targets from the upper flipper to score the lit award.
Layout:
| Premium/LE: | Pro:
| — | — |
|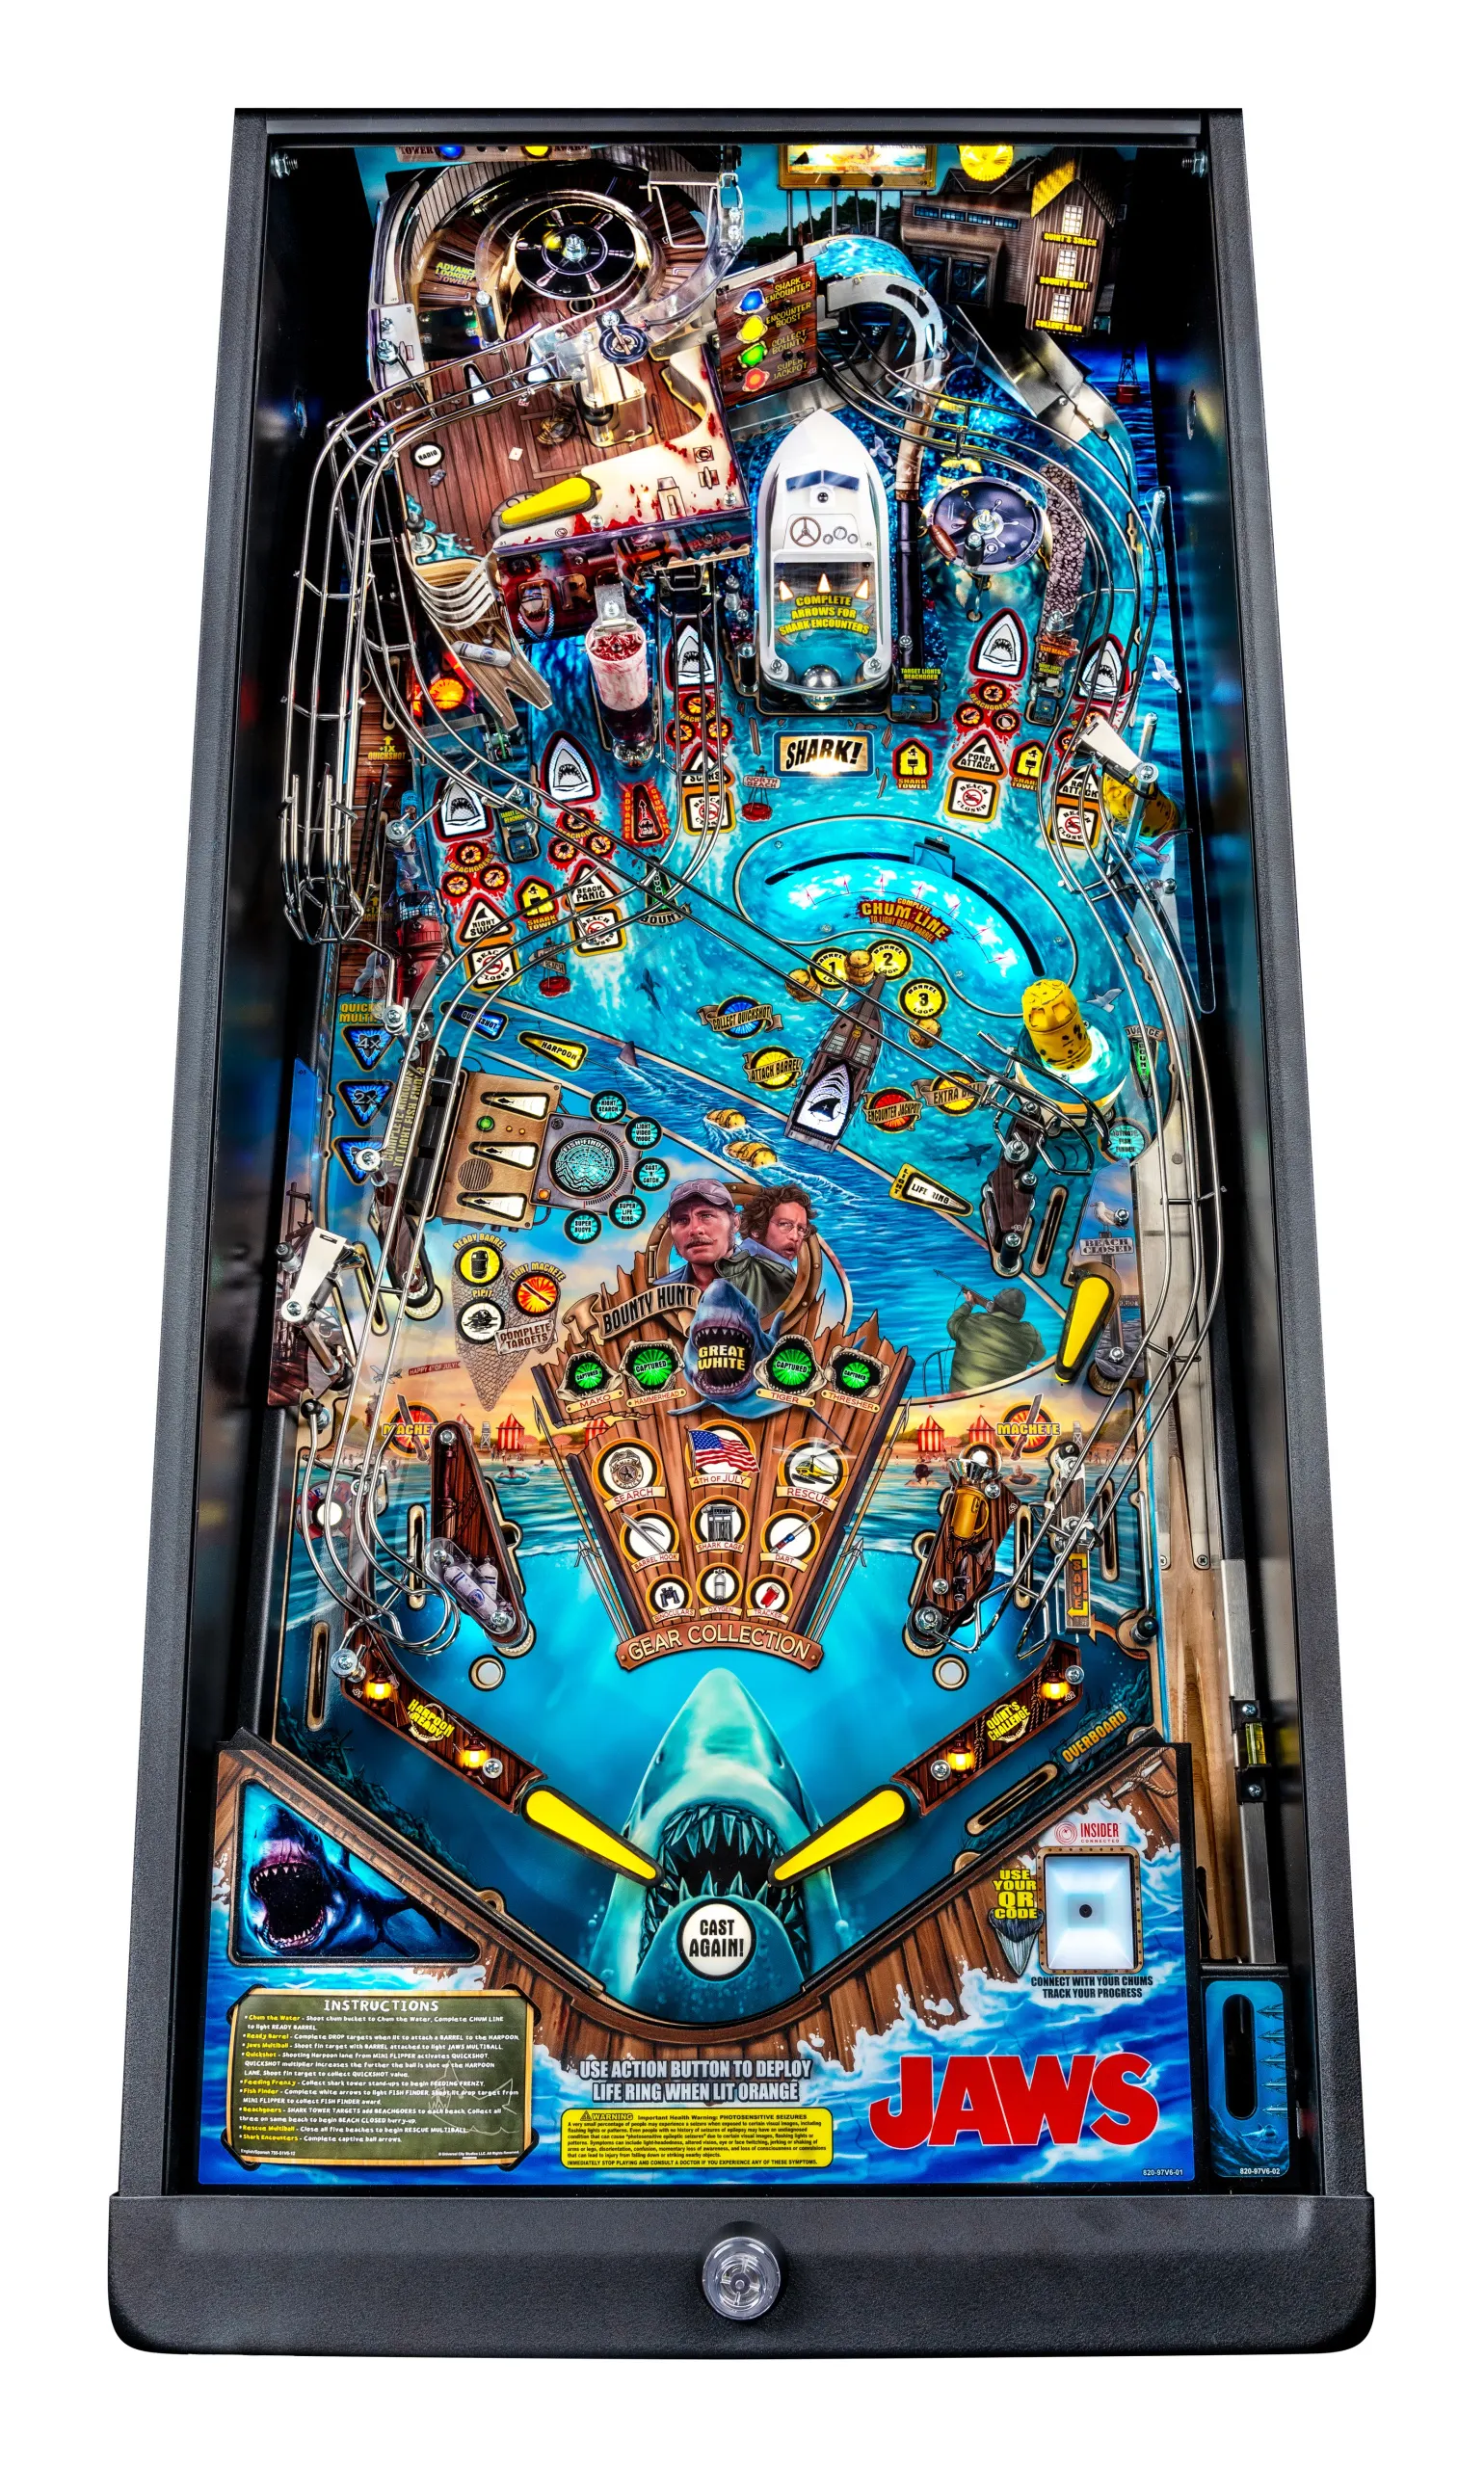 |
|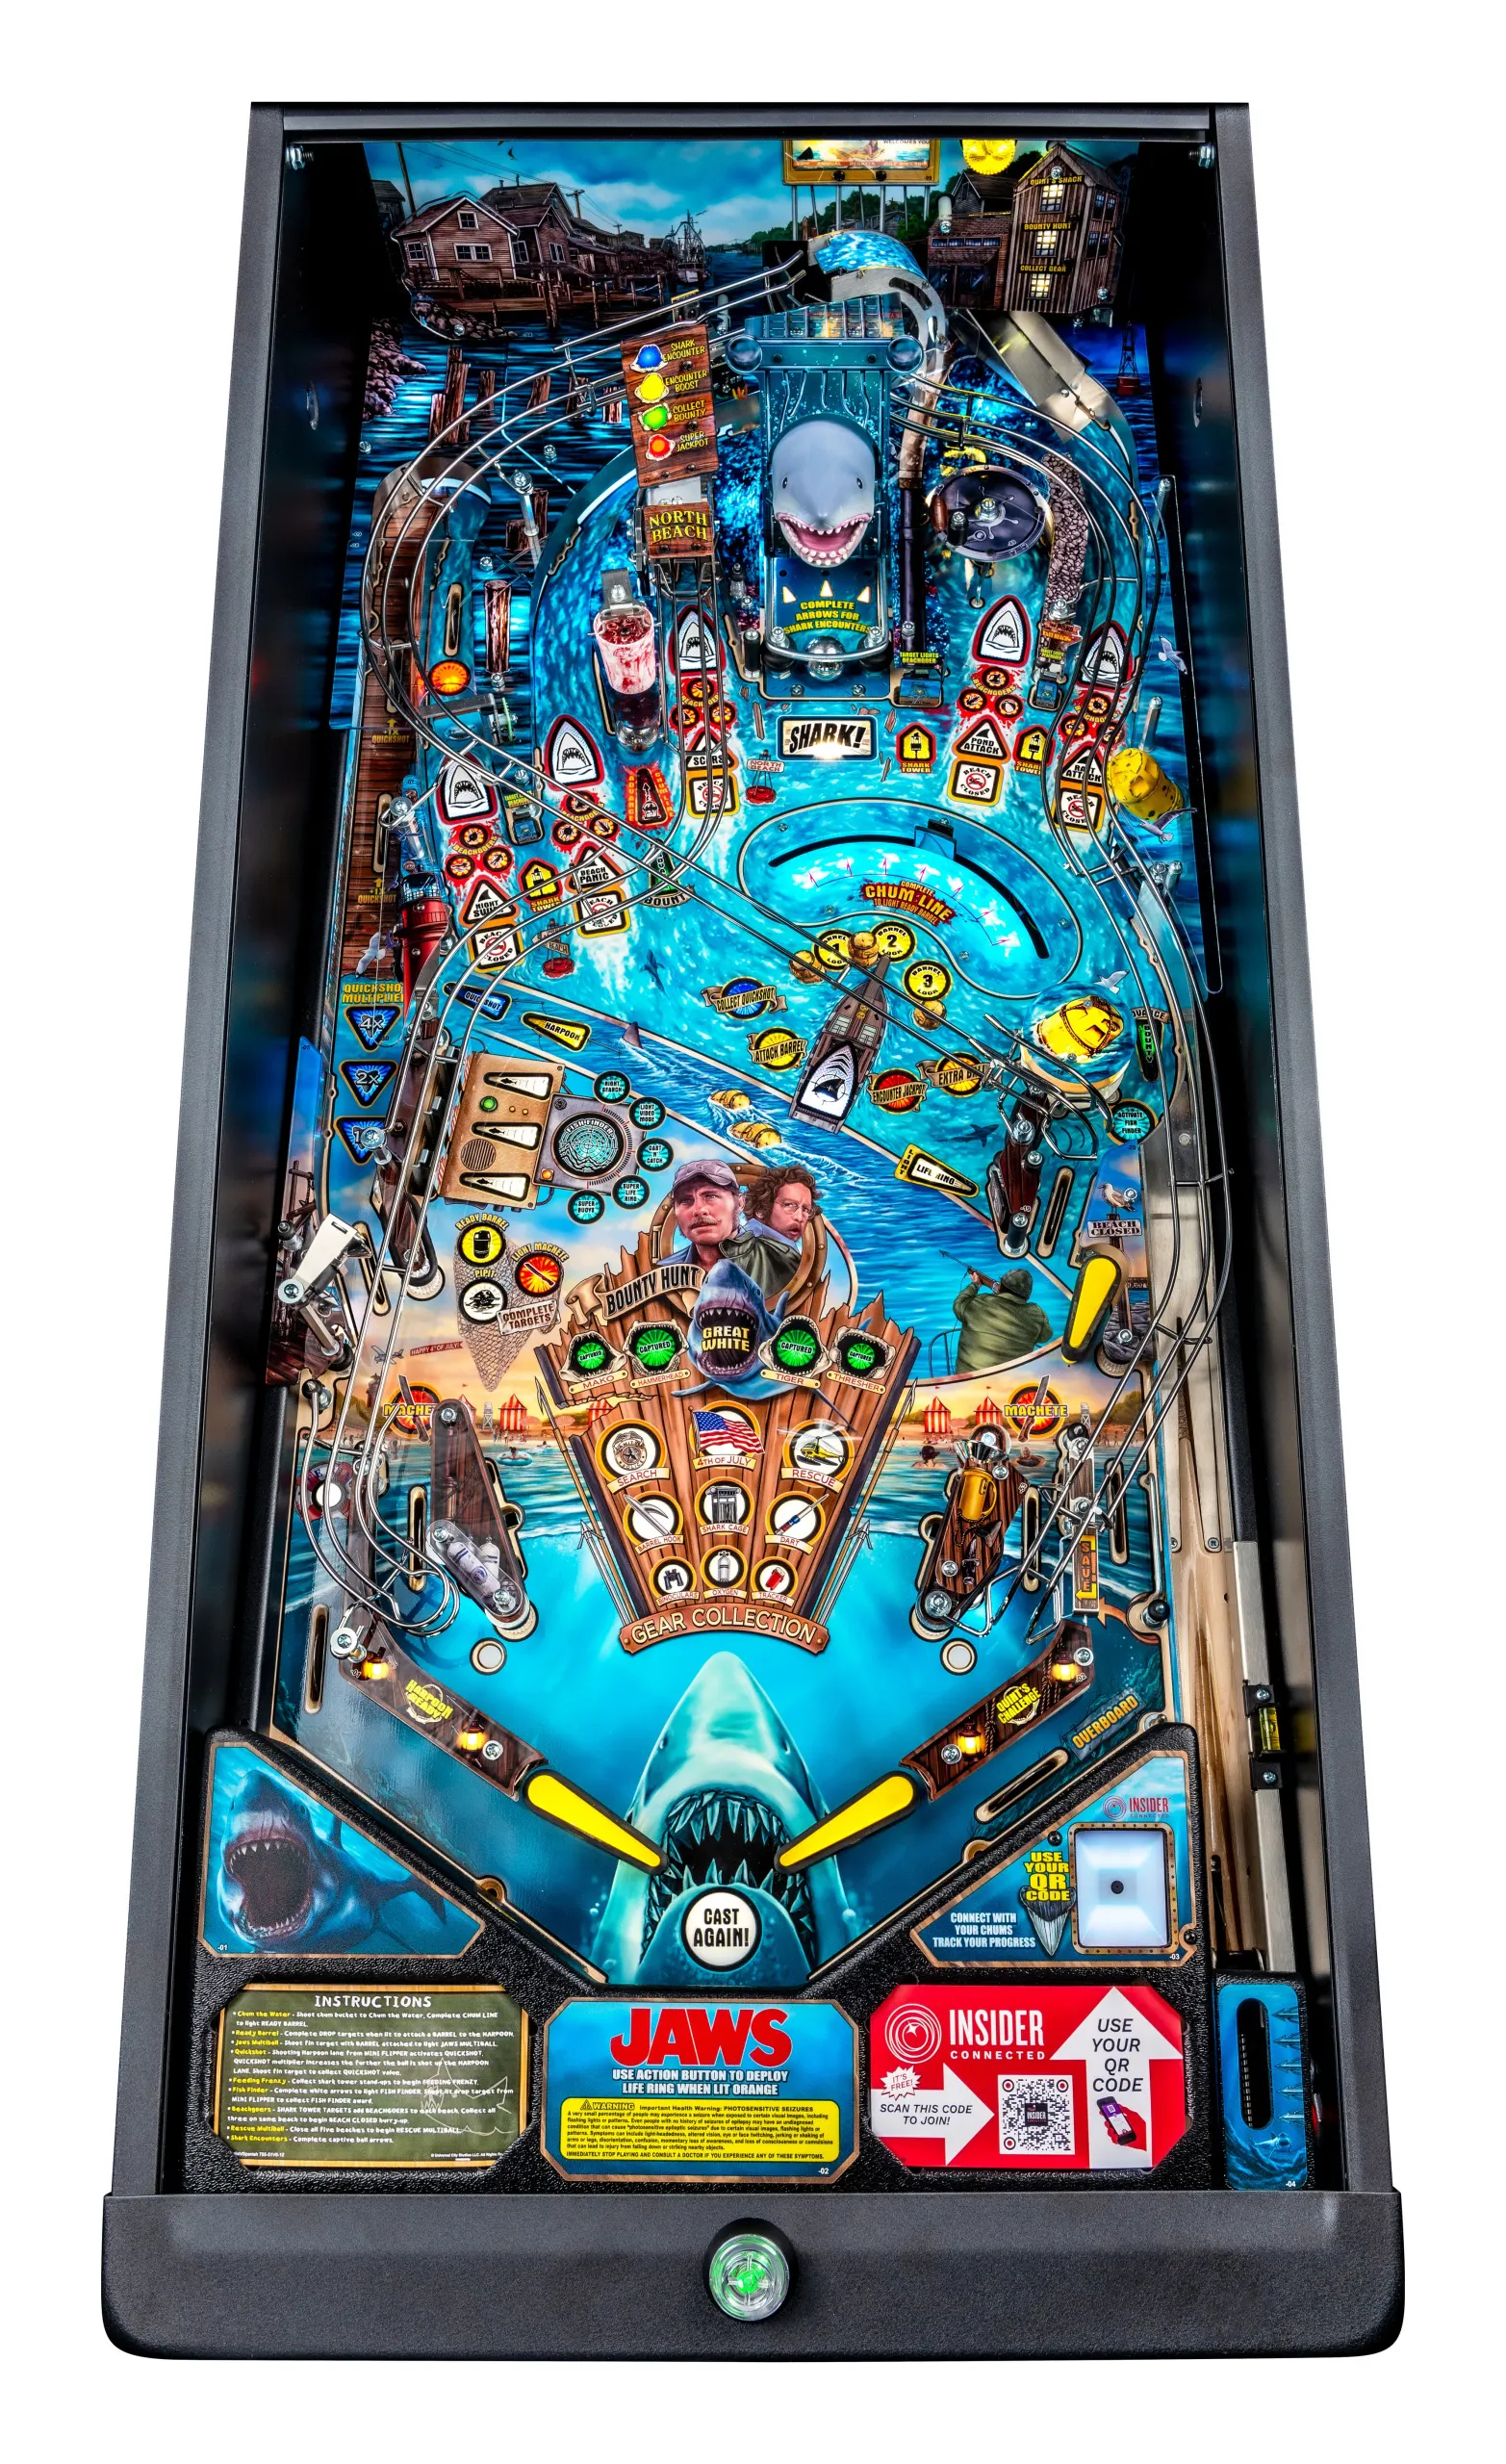 |
|
Modes of Play:
These modes are accessible by holding both flipper buttons during attract mode until a menu appears. The following options are available:
- Standard: See below for full rulesheet.
- Competition:
- Shark Hunter Allows you to play the Shark Hunter Video Mode as a standalone game, in exchange for “shark teeth” via Stern Insider. (Must be logged in with Insider to play.)
- 4th of July Challenge Play the 4th of July mini-wizard mode as a standalone game, with unlimited ball save, in exchange for “shark teeth” via Stern Insider. (Must be logged in with Insider to play.)
- Jaws: The Revenge Play as the shark himself in an 8-bit throwback game within a game. Requires 10 “shark teeth” via Stern Insider to play.
- The Shark is Broken Chaotic single-ball / multiball hybrid mode roughly based on the filming of Jaws and how difficult the shark animatronic was to work with. Requires the topper and 10 “shark teeth” via Stern Insider to play.
- Competition Install Not from the gameplay menu, but the following is changed if a Competition Install is performed from the utilities menu:
Skill Shots:
The multi-level skill shot changes at the start of each ball, once the previous one has been scored. You get a maximum of three skill shot attempts per ball.
- Level 1: Plunge into the pop bumper for 5M.
- Level 2: Plunge into the lane above the mini-flipper, without hitting the bumper, for 10M + light gear.
- Level 3: Shoot any target on the flashing left target bank, without any other switch hits, for 15M + light gear.
Each skill shot, regardless of level, also adds +5 seconds of ball save time.
There are also two secret skill shots and a super secret skill shot:
[details=”Spoilers”] Secret Skill Shots (awards the current skill shot value when hit):
- Shoot the chum bucket, without any other switch hits.
- Shoot either the left or right side of the captive ball area, without any other switch hits.
Super Secret Skill Shot (awards & advances the current value of the normal skill shot when hit:)
- Shoot the dead center of the captive ball area, without any other switch hits.
Note: on Prem / LE models, if shark hits are available, secret skill shots at the captive ball area cannot be hit. [/details]
Shark Encounters:
Shark Encounters are the main modes of the game. They can be started at any of the five “beach” shots, after enough shots to the captive ball / bash boat - 1 shot + 1 shot per Shark Encounter mode played.
Shooting any shot that feeds the left inlane, followed by the captive ball / bash boat, awards 2x damage.
On the Prem / LE, the shark bash toy comes up when Shark Encounter modes are lit. Shoot it before starting a mode to light encounter boosts for the next mode, and earn a score award of 5M the first time + 5M for subsequent “shark hit” shots. On Pro, this is done by shooting the captive ball / bash boat one more time before starting a mode.
When encounter boosts are lit, further shots to the center captive ball / bash boat will boost the next shark encounter in the following ways:
- Level 1: Hit any boat target to add 15 seconds of time to the encounter.
- Level 2: Complete all boat targets for 5M + light gear.
- Level 3: Complete all boat targets again for 2x scoring for the encounter.
Encounter boosts may also be progressed during a mode, as long as they were lit before starting the mode. Boosts earned in this manner will be instantly applied to the ongoing mode. On Pro, they are progressed in the same manner as before starting the mode. On Prem / LE, starting a mode with encounter boosts lit causes the shark bash toy to come up and stay up for the duration of the mode. Hit the shark to progress boosts – 1 hit for level 1, 2 hits for level 2, and 3 hits for level 3.
Making enough shots during a shark encounter qualifies the encounter jackpot at the fin target to complete the mode. This awards a certain percentage of the mode total and adds a permanent +1x multiplier to machete shots for the rest of the game. Failing to hit the fin in time lights the boat/shark for a backup encounter jackpot which is worth a smaller percentage of the mode total and does not add a machete multiplier.
On Prem / LE models, the radio target on the upper playfield spots a shot during modes, one time only per mode.
The five shark encounters are:
- Night Swim: Started at the left spinner. Shot value starts at 1M and increases by 750K for each blue shot made. This mode has 2 phases:
- Phase 1: Shoot blue shots to score. Fast blinking shots score 2x. After 4 blue shots (with 2x shots counting double), the left orbit, right ramp, and harpoon gate will be lit (with no 2x shot). Shoot any shot to proceed to phase 2
- Phase 2: First, all shots are briefly lit cyan. When they time out, 2 roving blue shots will move from the right side of the playfield to the left and back. After nailing any 3 of these shots (cyan + roving blue shots total), a final shot is lit at the left orbit to light the encounter jackpot at the fin drop target for 35% of the mode total. Missing the fin reduces the encounter jackpot to 20% of the mode total. The roving shots will continue to move across the remaining 4 shots while the final shot is lit, and can be hit for additional points.
- Beach Panic: Started at the “wave” ramp. All five shots are initially lit to score, with one rapidly flashing shot lit for 2x. On Prem / LE, both upper playfield shots are also lit. Making a shot unlights it until another shot is made. Once 8 shots have been made (with 2x shots counting double), the wave ramp is lit to light the encounter jackpot at the fin drop target for 50% of the mode total. Missing the fin reduces the encounter jackpot to 25% of the mode total. While the final shot is lit, the other 4 shots remain lit (except for the most recently hit shot) for additional points, albeit without any 2x shots.
- Scars: Started at the center ramp. Shoot the lit shots to score. On Pro, 2 shots will be lit per phase, shoot both to advance. On Prem / LE, 3 shots will be lit, shoot any 2 to advance. Hitting the shark tower stand up targets decreases the shots’ values. The 1st hit to a shark tower target in each phase deducts 2.25M from the value, then subsequent hits deduct another 1.5M, 1.125M, and finally 625k. The shot value returns to maximum at the start of each phase.
- Phase 1: Starting value 6M. Wave ramp, right ramp, and lookout tower (Prem / LE) are lit. Make 2 shots to light center ramp, then shoot center ramp to advance to phase 2.
- Phase 2: Starting value 7M. Wave ramp, harpoon lane, and Orca wheel (Prem / LE) are lit. Make 2 shots to light center ramp, then shoot center ramp to advance to phase 3.
- Phase 3: Starting value 8M. Left target bank is lit. Shoot any of the 3 targets to light encounter jackpot for 35% of the mode total. Missing the fin reduces the encounter jackpot to 15% of the mode total.
- Pond Attack: Started at the fishing reel spinner. Lit shots score points and add 100k to an award at the fishing reel. Shoot the harpoon lane immediately after making the fishing reel to double the award, with 3x and 4x awarded depending on the strength of the shot. Score 3 fishing reel awards to light the encounter jackpot for 20% of the mode total. Missing the fin reduces the encounter jackpot to 10% of the mode total.
- Raft Attack: Started at the right ramp. Shoot either the left or right ramp to raise the fin drop target for 5M + 2M per award, or shoot a lit combo shot while the fin is raised to multiply the award value at the fin target. Score 3 awards at the fin drop target to light the encounter jackpot for 30% of the mode total. Missing the fin reduces the encounter jackpot to 15% of the mode total. Combos are as follows:
- Right ramp, center ramp, fin: 2x
- Right ramp, left orbit, fin: 3x
- Left ramp, center ramp, fin: 2x
- Left ramp, left orbit, fin: 3x
- Left ramp, harpoon gate, fin: 4x
- Left ramp, lookout tower, fin (Prem / LE only): 5x
Play all five shark encounters to light 4th of July mini-wizard mode at the center ramp.
After playing the above mini-wizard mode, the shark encounters can be played again as “challenges”. Encounter boosting is disabled for shark encounter challenges, and their timers are decreased to 30 seconds as well, but mode scoring is doubled. In place of increasing the machete multiplier, each completed shark encounter challenge increases a shot multiplier at the shot used to start the respective mode, for the rest of the game.
Closing the Beaches / Beach Closed Hurry-Ups:
There are five different beaches surrounding Amity that need to be closed in the wake of approaching shark attacks, represented by five different shots on the playfield. To close each beach, three beachgoers must be rescued at their respective shots - they can be found by shooting for the shark tower targets surrounding each shot.
Beachgoers cannot be rescued during multiball modes, they become temporarily unlit but return when the multiball ends.
Once all three beachgoers have been rescued at one beach, a Beach Closed Hurry-Up will start at that shot to close the beach. The value starts at 15M + 3M for each time Search or Rescue multiball has been played + 250K for each character combo collected, and if collected, boosts all further lit shots to that closed beach by 20% of the hurry-up value, rounded down to the nearest 100 points. Machete multiplies the collected value of the hurry-up but not the value boost to subsequent shots, (for instance, a 15M hurry-up with 3x machete is worth 45M, but still only boosts subsequent lit shots and hurry-ups by 3M). Normally, this bonus award is removed after either Rescue Multiball or Search Multiball have been played, but catching the hammerhead shark will hold the beach closed values across the entire game, including restoring any previously removed values if Search and/or Rescue Multiball were played prior to catching the hammerhead shark.
Note: Regardless of whether or not the hammerhead shark has been caught, the value boosts are inactive during Search Multiball and Rescue Multiball. If either multiball is completed successfully, the value boosts from the most recent set of 5 hurry-ups are active during Victory Combos, even if the hammerhead shark has not been caught.
The 5th hurry-up’s initial value is increased by the base values (not including Machete) of previously collected hurry-ups. This additional value does not factor into the calculation of the value boost applied to subsequent lit shots. For example: If the first 4 Beach Closed hurry-ups were collected at a total value of 34.5M, and 2 character combos were collected prior to starting the 5th hurry-up, then the 5th hurry-up would start at 50M (15M + 500K for 2 character combos + 34.5M for previously collected hurry-ups). Collecting it at max value would award 50M but the value boost would still be 3.1M (20% of 15M + 500K). If the value ticks down by half before it is collected, it would award 25M and the value boost would be 1.55M.
Additionally, a ball saver is active during the 5th hurry-up. Draining during this time loses the hurry-up but not the ball. Ending the 5th hurry-up, whether by collecting it or failing to collect it, starts either Rescue Multiball or Search Multiball, after which the beachgoers and Beach Closed hurry-ups are reset.
Note: The 5th hurry-up cannot be stacked with any shark encounter modes or multiballs. After rescuing 14 beachgoers, the 15th beachgoer will temporarily become unlit whenever a Shark Encounter mode is running, preventing the player from starting the 5th hurry-up. Likewise, no other modes or multiballs can be started during the 5th hurry-up.
Rescuing 8 beachgoers awards an extra ball and lights gear.
Bounty Hunts:
Bounty hunts are started at the right ramp after enough fishing reel spins - or, if one isn’t currently running, Quint’s Shack can light a bounty hunt. Unlike typical modes, bounty hunts run in the background of normal single-ball play, are untimed, and only require the player to complete the tasks assigned on the display. Progress on bounty hunts are maintained from ball to ball.
The four sharks a player can hunt for are:
- Mako: 80 spins, 3 ramps, 1 pop hit, 2 chum bucket hits.
- Thresher: 6 ramps, 3 3-bank targets, 5 boat shots, 4 chum bucket hits.
- Reward: 2 attempts per Quint’s challenge knot; 2x multiball scoring while flip-locked
- Bonus Reward: +1x Base Machete
- Hammerhead: 150 spins, 6 3-bank targets, 4 pop hits, 2 mini-lanes.
- Reward: Change fish finder award with left flipper; beach closed values held
- Bonus Reward: +1x Base Machete
- Tiger: 6 3-bank targets, 5 pop hits, 10 boat hits, 4 mini-lanes.
- Reward: Unlimited Flip-Lock Uses (make five major shots to relight)
- Bonus Reward: +1x Base Machete
Once the assigned tasks have been completed, the player must reel in their find by shooting the fishing reel spinner. This will start bounty hunt multiball. If the player completes bounty hunt multiball, they will score the bonus reward.
“Advance bounty” when lit, at either the chum bucket (lit via reel hits) or mini-lane (lit via shark tower targets), will increase the jackpot given for completing the bounty hunt and capturing the shark by 2.5M x the number of sharks captured. Each advance bounty shot is lit for 10 seconds.
If the shark was not captured during bounty hunt multiball, the player can revisit the bounty hunt to capture them again. The required shots are halved for revisited bounty hunts, but the multiplier for the bounty jackpot will also decrease and bonus rewards won’t be scored. All progress during the multiball is retained (if the shark was below 30% health, it will reset to 30%).
Once the player captures all four sharks, or sells all of their gear to Quint, a hidden fifth bounty hunt will be qualified…
Bounty Hunt Multiballs:
Sharks are vicious creatures and must be weakened before they can be successfully caught. After completing the requirements for a bounty hunt and shooting the fishing reel, a multiball will start where the player reels in the shark and weakens it.
The multiball for each bounty hunt shark slightly varies depending on which shark was reeled in:
- Mako - 2-ball multiball w/ 5 seconds added to ball save.
- Thresher - 3-ball multiball.
- Hammerhead - 3-ball multiball with add-a-ball at the chum bucket captive ball.
- Tiger - 3-ball multiball with two add-a-balls, one at the chum bucket, then another at the center captive ball targets.
The basic mechanics of each bounty hunt multiball is the same - shoot any green shot to score an award (which can be increased by spinning the fishing reel) and light the “Shark!” insert, then shoot the captive ball / shark bash toy to weaken it, then repeat until the shark is captured.
The shark’s strength is indicated both on the screen and by the green lights on the chum line. It starts at 100% and decreases by 35% for each shark hit, except for Tiger Shark which takes 25% damage per hit. After the first hit, the shark will gradually recover its strength over time, in 2% increments. A hit at 36% or lower (26% or lower for Tiger Shark) will bring the shark’s strength down to 1%, lighting a final green shot:
- The fishing reel is always lit for the final green shot.
- On Prem / LE only, the Orca wheel is also lit.
- For Mako Shark only, the left orbit is also lit.
Shoot any final green shot followed by the captive ball / shark shot to capture the shark and award the bounty. Every bounty collected adds +1x to the super jackpot multiplier during super celebration multiball.
The bounty is a large score award determined by the following: (10M + 1M x lit beachgoers + 2.5M x flashing targets hit during feeding frenzy) + total score gained from lit “advance bounty” shots x number of sharks captured.
Once the shark has been captured, celebration multiball will start. Shoot the green flashing shots for jackpots worth 250K + 75K per jackpot scored. This value is maintained across the entire game. Each arrow unlights when collected.
The super jackpot is lit at the captive ball / shark shot when 2 or more arrows are unlit. Collecting a super jackpot relights a green arrow. Relighting all green arrows unlights the super jackpot. Super jackpots are worth (jackpot value) x (number of unlit lower playfield jackpots + 1). Note that the 2 upper playfield shots on Prem / LE do not count towards the super jackpot multiplier. Collecting all of the green arrows lights a massive super jackpot which relights all green arrows when collected.
Jaws Multiballs:
To lure out Jaws, the player first must chum the water by shooting the captive ball with the chum bucket sculpt above it. Shooting the flashing red arrows will add to the red LED lights on the “chum line”. The total value of the chum line shots determines the jackpot value for the multiball that follows. For the first Jaws Multiball, 1 hit to the chum bucket starts the chum line, then 3 red arrows are lit at the left orbit, wave ramp, and center ramp, moving to the right every few seconds and wrapping around from the right ramp back to the left orbit, and the chum bucket remains lit to also advance the chum line. For Jaws Multiball 2, starting the chum line requires 2 hits to the chum bucket, and the red arrows unlight when hit or when moving past the right ramp. Once all 3 red arrows are gone, the chum bucket lights 3 new red arrows. For Jaws Multiball 3, starting the chum line requires 3 chum bucket hits, and the chum bucket no longer advances the chum line once it’s started.
For the first Jaws Multiball, once the chum line is completed, all the three shots that feed the left flipper (i.e., harpoon insert shot, left orbit, and center ramp) will be lit yellow to raise the shark fin. Shoot the shark fin to attach a barrel. For the remaining Jaws Multiballs, completing the chum line lights Ready Barrel at the target bank, then completing the targets lights only the left orbit and harpoon lane will be lit yellow to raise the shark fin.
Jaws Multiball 1 requires 1 barrel to be attached, Jaws Multiball 2 requires 2 barrels, and Jaws Multiball 3 requires 3 barrels.
Once the required amount of barrels have been attached to Jaws, Jaws Multiball can be started by making any shot that feeds the inlane posts (i.e., the harpoon lane, left orbit, center ramp or the right ramp). The three multiballs play as follows:
- Jaws Multiball 1: Reel Him In! Shoot the red flashing shots to collect awards. After collecting three awards, a jackpot shot will flash yellow and red. Shooting additional red shots before shooting the jackpot will increase the jackpot value, up to a maximum of 3x. Collect 5 jackpots to complete.
- Jaws Multiball 2: The Chase. Collect switch hits to light all major shots for jackpot, then keep collecting increasing amounts of switch hits to light them again. Collect a jackpot at all five shots, then collect 90 more switch hits, to light the captive ball for super jackpots worth 20M for 10 seconds.
- Jaws Multiball 3: Cage Dive. Shoot the red shots before time runs out to increase the hurry-up jackpot that can be scored at the center captive ball / shark. After scoring three jackpots, 50M super jackpots can be scored at the fin drop target, and multiplied with subsequent fin hits.
During any Jaws Multiball, a ball can be added by shooting the chum bucket enough times to fill up the chum line. 3 hits are required for the first multiball, 8 hits for the second, and 5 for the third.
Once any Jaws Multiball has been completed, victory combos will start (which are also rewarded once any other multiball has been completed). Shoot the lit jackpot shots as combos to increase their value.
The center ramp lights to start Smile, You Son of A… final wizard mode as soon as Jaws Multiball 3 ends. Once this option becomes available, the player can opt to start the final wizard mode or “keep chumming” and play for other objectives; the final wizard mode will then relight the next time the chum line is completed.
Flip-Lock:
Jaws features a Flip-Lock mechanic at the mini-flipper during all multiball modes. If a ball is being held at the flipper, press the action button and the mini-flipper will remain raised, allowing multiball to be played with fewer balls. If the player wants to release the ball from the Flip-Lock prematurely, they can hold the action button and the flipper will automatically lower.
If 2 balls are in play and the 2nd ball drops into the mini-flipper lane while Flip-Lock is active, the mini-flipper will automatically perform a quick release then flip to send the lower ball back into play then catch the upper ball. This does not occur when there are 3 or more balls in play.
Flip-Lock ends once the 20-second long timer expires, indicated by the flashing barrel atop the bumper. Normally, Flip-Lock can only be used once per ball in play.
The following bounty hunt sharks add perks to Flip-Lock, once caught:
- Mako: Increases the flip-lock timer.
- Thresher: Multiball scores are doubled if the ball is held in the flip-lock.
- Tiger: Flip-Lock is no longer limited to once per ball. Instead, it relights after 5 major shots have been made.
Other Scoring:
Gear Collection:
Gear can be lit at the right ramp in various ways:
- Making a level 2 or 3 skill shot
- “Encounter bonus” (2nd encounter boost award)
- Making four jackpots during night search multiball
- Scoring a quickshot
- As the 2nd & 4th awards from Pipit
- Rescuing the 8th beachgoer
- Capturing the Mako shark on the first attempt
- “Light gear” wheel award (Prem / LE)
Once lit, a single shot to the right ramp will collect the currently flashing gear, which can be cycled through with the right flipper.
There are six different types of gear available, listed below in the order they are cycled through using the right flipper:
- Binoculars: When hitting a shark tower standup target, 2 beachgoers are lit instead of 1, if possible. Consumed after 3 successful uses. Hitting a shark tower target with 0 or 1 unlit beachgoers at the corresponding beach(es) does not count against the 3 uses.
- Oxygen Tank: For the rest of the ball, all ball save timers and mode timers (ie. shark encounters, feeding frenzy) are boosted. +5 seconds for ball save, +8 seconds for modes.
- Tracker: For the next three chum line advances, the line is advanced twice as fast.
- Barrel Hook: Jaws Multiball Extended. Once the player returns to single-ball play, another ball will be launched and multiball will continue.
- Shark Cage: One-time ball save when hitting the fin drop target. The ball save will continue to activate on every fin hit until it actually saves the ball, at which point it is consumed.
- Dart: The next bounty hunt advances twice as fast and a +1x multiplier is added to the final bounty award.
Once all six types of gear have been found, shooting the right ramp again will allow the player to either sell their gear to Quint for points & qualify the final bounty hunt, or keep their available gear and take 15M + 5M per previous gear cash out.
If the player chooses to sell their gear, the point award is multiplied based on how many pieces of gear the player hasn’t fully used:
| Unused Gear | Multiplier | Value (1st time) |
|---|---|---|
| 1 | x3 | 45M |
| 2 | x5 | 75M |
| 3 | x8 | 120M |
| 4 | x12 | 180M |
| 5 | x16 | 240M |
| 6 | x25 | 375M |
A partially-used piece of gear, e.g. Binoculars that have been used once or twice but not the full three times, counts as unused.
If the player chooses to keep their gear, the cash out can be relit the next time the player lights gear.
+50M is added to the gear cash out for every successful knot that was tied during Quint’s Challenge. This bonus is not subject to the “unused gear” multiplier.
The gear cash-out value cannot be multiplied by Machete.
If all gear has been used, draining will automatically remove the gear from the player’s collection without the chance to sell them.
Fish Finder:
Fish Finder is qualified at the left target bank.
On Pro: Fish Finder is qualified by simply hitting the stand-up targets in single-ball play, regardless of whether the arrows are lit. The first Fish Finder award is qualified after 3 hits, increasing by 1 hit for each subsequent award. When Fish Finder is lit, further hits do not count towards qualifying the next award.
On Prem / LE: Initially, all 3 arrows in front of the drop targets are unlit. A roving blinking arrow moves up and down (top, center, bottom, center, repeat) across the unlit arrows. Hitting the target indicated by the flashing arrow causes it to light up solid and moves the blinking arrow to an adjacent unlit arrow. The first hit of the game also spots an adjacent arrow. Solidly lighting all 3 arrows qualifies Fish Finder.
When Fish Finder is qualified, it can be activated by rolling through the lane directly above the mini-flipper. For the first Fish Finder award of the game, all 3 arrows will flash; for the 2nd award, the center arrow and either the upper or lower arrow will flash; for subsequent awards, only 1 of the 3 arrows will flash. Shoot any flashing target on the left target bank to score the flashing award. Hitting any other switch besides the mini-flipper lane disables the flashing arrows until the mini-flipper lane is rolled over again.
There are 5 Fish Finder awards:
- Super Buoys: Slingshots are lit for more points than usual. Alternate between lit slingshots for values starting at 100k per sling and a multiplier applied for each lit sling hit in a row without hitting the unlit. Lane guides by flipper also light to show lit sling.
- Super Life Ring: Every shot to the light life ring target scores a value starting at 10M + 5M per shot and adds more time to the award. If life ring isn’t lit, then collecting a shot during super life ring will automatically qualify it.
- Cast ‘n’ Catch: Two “count-ups” are lit at the center and right ramp for a value starting at 1M, increasing rapidly to 30M, and then resetting back to 1M.
- Light Video Mode (Shark Hunter): Started at the right ramp. Use the flippers to fire harpoons at the sharks while avoiding the divers which remove harpoon shots. 2X scoring for the rest of the video mode plus harpoons and extra time are awarded if and when your score reaches 5000. Bonus items you can shoot in the video mode include +5 harpoon shots, and an extra ball icon that moves quickly. Sharks score 500 points each, or 1000 points each after achieving 2X scoring. Scores 3000 x video mode score (e.g. 5000 video mode points = 15 million points when you finish video mode). This award cannot be multiplied by Machete.
- Night Search Multiball: 2-ball multiball. Jackpots are lit at all major shots, but disappear if time runs out. Hit any Fish Finder target to relight jackpots, and the bash boat targets to increase their value. After scoring eight jackpots, shoot the shark within 10 seconds for as many super jackpots as possible. Make four jackpots to light gear and collect a super jackpot to increase the machete multiplier. Victory combos starts after the super jackpot round times out. (On Prem / LE models, the steering wheel on the Orca will award an add-a-ball, one time only.)
Normally, the lit award changes with bumper hits if “activate fish finder” isn’t lit at the mini-lane. If the player captures the hammerhead shark, then they can change the lit award by pressing the left flipper if multiple are available.
Collect all five awards to light super cast ‘n catch at the center ramp.
Quickshots:
If the harpoon lane isn’t lit to attach a barrel to Jaws, it can be lit for quickshot by rolling through the right lane above the mini-flipper. Shoot the fin drop target shortly following the harpoon lane shot to collect the quickshot award. The timer decreases with every quickshot collected.
The base value starts at 3M and increases by 200K for each beachgoer rescued.
Every completed quickshot - or switch the ball rolls over after passing through the harpoon lane - increases the quickshot multiplier by +1x up to a max of 7x. The multiplier value is reset once the player misses a quickshot, so quick, precise shooting is required to maximize scoring potential from them. The quickshot award is also subject to shot multipliers from the lit machete lanes.
Gear is lit at the right ramp for every successful quickshot made.
Make 3 quickshots for an extra ball.
Feeding Frenzy:
A timed feeding frenzy mode starts after collecting enough complete sets of shark tower targets: 2 are needed for the first one, then 5 for the second, etc.
During feeding frenzy, each shot to the flashing shark tower targets scores a value that increases with every switch hit (15k for spins, 75k for other switch hits), and gets multiplied with each flashing shark tower target hit: 1x for the first target, 2x for the second, and 3x for the third. The feeding frenzy total is maintained across the entire game and is awarded in bonus at the end of each ball. Every subsequent feeding frenzy in a game adds 250k to the base target value.
Feeding frenzy cannot be started during any multiball mode. However, it can be brought into them.
Quint’s Shack:
The right ramp is lit for Quint’s Shack after advancing ORCA with strong shots up the left “wave” ramp - “sneak attacks” (missed shots that fall onto the right ramp exit) won’t count.
If Quint’s challenge is lit at the right return lane, ORCA cannot be advanced and Quint’s Shack can’t be relit until Quint’s challenge has been started.
If bounty hunt isn’t lit, then Quint’s Shack will always award light bounty hunt. Otherwise, Quint’s Shack offers several rewards:
- Light shark encounter
- Light 1 or 2 beachgoers
- Light activate fish finder
- Light gear
- Max quickshot X (at 7x)
- Light Quint’s challenge
- Light life ring
- Shark Ramps (Pro)
- Light wheel award (Prem / LE)
- Add 5M to bonus
- +1x bonus
- 5M
Quint’s Challenge:
Completing ORCA at the left “wave” ramp lights the right return lane for Quint’s Challenge, and will light one shot to start a combo. The combo sequence only starts when the first shot is made, and each successive challenge increases in difficulty with shorter timers for each shot. For knots level 3 and 4, the player has a limited time to make the initial shot that starts the combo.
Quint’s Challenge is also lit after collecting the 5th successful Pipit award.
Normally, only one attempt is given per knot. Capture the thresher shark to get two attempts to tie each knot.
Easy
- Left orbit - right ramp - chum bucket
- Center ramp - right ramp - chum bucket
- Wave ramp - lookout tower (Prem / LE)
Medium
- Left orbit - right ramp - wave ramp
- Center ramp - reel spinner - chum bucket
- Wave ramp - wheel spinner - harpoon lane (Prem / LE)
Hard
- Reel spinner - harpoon lane - right ramp
- Center ramp - right ramp - center ramp - reel
- Left orbit - right ramp - wave ramp - lookout tower (Prem / LE)
Extra Hard
- Center ramp - reel - harpoon lane - life ring target
- Wave ramp - harpoon lane - life ring target
- Wave ramp - lookout tower - life ring target (Prem / LE)
- Center ramp - right ramp - wave ramp - lookout tower - right ramp (Prem / LE)
Tying a knot during Quint’s Challenge increases the bonus multiplier. The first knot of a game adds +1x to bonus only for this ball, but the 2nd+ knots add +1x to bonus for the rest of the game. Each tied knot also increases the award for selling your gear by 50M.
Pipit:
Completing the left target bank while “Pipit” is lit will throw a stick for Pipit to fetch at a random shot (lit purple and fades to white as time decreases). Collect the lit shot before time runs out to score 5M x a multiplier that increases each time Pipit has successfully fetched the stick and decreases with each failure.
Pipit will also find awards for you with every stick he successfully fetches, given in the following order:
- +1x Machete (temporary)
- Light Gear
- Light Life Ring
- Light Gear
- Light Quint’s Challenge
- Light Wheel Award (Prem / LE)
- +1x Machete (temporary)
If any of the above awards are already available, ie. life ring or Quint’s challenge is already lit, +1x Machete (temporary) will be awarded in its place.
Machetes (Shot Multipliers):
Completing the left target bank while “light machete” is lit will light a return lane for “machete”. This corresponds to a shot multiplier, awarded on the next shot made after either rolling through the lit return lane, or shooting a ramp that feeds the general area of that lane. If the base machete multiplier is at 4x, then the harpoon lane must be hit to relight “light machete” at the target bank.
The machete multiplier starts at 2x and can be increased by +1x permanently by…
- Completing any shark encounter
- Catching a bounty hunt shark (excluding Mako) on the first attempt
- Completing night search multiball
and temporarily increased from…
- Completing the drop targets while a Machete is available (+1x)
- Successfully rescuing Pipit (1st and 7th+ awards of a set, or given if any award is already active) (+1x)
- Collecting the +3x Machete wheel award (Prem / LE) (+3x)
Machete cannot be lit during multiballs unless lit via Pipit, or during wizard modes, but they can be brought into them at their current value.
Life Ring:
Shoot the “light life ring” target once, then shoot it again while it’s flashing to qualify the life ring ball save. The “life ring” insert above the left outlane only lights for a short time after pressing the action button (when flashing orange), so it must be timed well to save balls that drain there.
A grace period is provided for the first life ring award in a game, and will save the ball even if the left outlane has already been registered. Afterwards, the life ring timer will decrease with every successful use.
Life ring also lights with every shot to its target during the super life ring fish finder mode, and as the third award from Pipit, if it isn’t already lit.
Character Combos:
There are seven unique shot sequences on Jaws that award increasing points (5M + 5M) when completed, each displaying a memorial for a certain character. These character combos can only be completed during single-ball play. Each unique combo adds +250k to all further closed beach shots.
- Chrissie Watkins: Left orbit - right ramp - center ramp
- Pipit: Wave ramp - harpoon lane (Pro) / lookout tower (Prem / LE)
- Alex Kintner: Right ramp - center ramp - reel spinner - harpoon lane
- Ben Gardner: Center ramp - right ramp - left orbit
- Scout Leader: Reel spinner - harpoon lane - life ring target
- Sam Quint: Reel spinner - harpoon lane - captive ball / shark
- Goat: Center ramp - right ramp - chum bucket
Orca Wheel Awards (Prem / LE):
The upper playfield on Prem / LE models of Jaws has an associated wheel award. It lights at the start of the game, and can then be lit at the Orca’s steering wheel spinner with enough shots to the lookout tower ramp on the upper playfield. Press the action button to lock in the displayed award once the dial is over it.
The five awards are, from top to bottom:
- Shark Ramps (flashing white ramp shots score 3M per hit; bumper hits relight ramps that aren’t already lit. You can also start this mode on the Pro model as a random award from Quint’s shack)
- Light Gear
- +3x Machete (temporary)
- Shark Combos (combo shots score increasing values per hit)
- Super Spinner (spinner is worth 300k, for a single rip only; can be lit up to three times. Worth 2x if made as a combo off of wheel spinner, reel spinner, or right ramp)
When all five wheel awards have been scored, the sixth wheel award, Say Ah!, will be unlocked.
Points can also be scored after enough lookout tower shots, or steering wheel spins, even if a wheel award isn’t lit (up to 25M). Extra ball is awarded after eight lookout tower shots.
There is a special combo on the Prem / LE called the Quint Combo, awarded for shooting the lookout tower ramp immediately followed by the right ramp when the ball exits out of the upper playfield. Quint Combos start at 5M and increase +500k per combo, to a max of 10M. The Quint combo value resets at the end of each ball.
Extra Balls:
Extra ball is awarded instantly…
- After rescuing 8 beachgoers
- On the 3rd quickshot scored
- By shooting the extra ball icon during video mode
- At 8 lookout tower shots (Prem / LE)
If disabled, extra ball scores 15M. The 15M compensation for these extra balls can be multiplied by machete.
End-of-Ball Bonus:
- Ball Bonus (more information needed)
- Feeding Frenzy points
All multiplied by the bonus multiplier which increases as knots are tied during Quint’s challenge.
Wizard Modes:
4th of July (Mini-Wizard Mode):
Start all five shark encounters to light this mini-wizard mode at the center ramp.
Keep all five beaches open before it’s too late! The five shots that were used to start the encounters are the same shots you have to make during this mode. Each shot is lit on a timer indicated by the inserts in front of it; once the beach closed insert is lit, you won’t be able to make that shot any more.
The goal of 4th of July is to collect fireworks to keep the beaches open. This is done by shooting the lit shots, which will also reduce the inserts in front of that shot by 1; over time, the inserts will increase in presence faster as more and more shots are made. Once 25 fireworks have been collected, the captive ball / bash boat will be lit for a super jackpot, which also reopens one beach that has already been closed. The super jackpot multiplier increases depending on how many beaches are currently open.
Center ramp - right ramp combos and repeated shots (after the third shot in a row) are discouraged. The former will not impact the timers for those shots whatsoever, and repeated shots will deactivate the beach until another unique shot or the boat is made.
A shot to the harpoon lane, or any Orca upper playfield shot (Prem / LE), will reset all beach timers and keep the mode going. Completing the fish finder targets will add fireworks, without decreasing any beach inserts.
4th of July mode ends once all five beaches have been closed. The shark encounters can then be played as “challenges” for increased shot multipliers.
Every firework collected during 4th of July adds 150k to the jackpots during super celebration multiball.
Rescue & Search Multiballs:
Once all five beaches have been completely evacuated and closed, the ball will drain and the player will be given a choice between either Rescue Multiball or Search Multiball. If the player has only one beachgoer left, and another mode is currently running, the final beachgoer won’t be lit until the mode ends. A ball save is also given while the final hurry-up is available.
- Rescue Multiball: The beachgoers have to be evacuated before the shark devours them! Shoot the flashing shots to score 1x, 2x, and 3x jackpots depending on the beachgoers that were successfully saved at that shot. One blue shot represents the pursuing shark, which will eat beachgoers at the corresponding shot unless the player can shoot the blue shot in time. Spot the current blue shot by completing the 3-bank or hitting the lookout tower ramp (Prem / LE). Once all fifteen beachgoers have been either evacuated or devoured, the super jackpot can be scored by first shooting the boat captive ball, then repeatedly hitting the fin target. Each shot to the fin target increases the subsequent super jackpot value by 2M to a max of 30M, and it can be scored as many times as possible before time runs out. Balls can be added by hitting the chum bucket six times.
- Search Multiball: Danger lurks beneath the depths of Amity Island… The first phase of this multiball is played with 2 balls and has a 30 second ball save, but further ones can be added by hitting all of the orange arrow shots. Shoot the chum bucket, or complete the shark tower targets, to raise the shark fin and light it for fin jackpots worth 5M + 2M per jackpot. Once five fin jackpots have been scored, the next phase will start, with a minute-long timer. Fend off the shark by shooting the center captive ball for 3M + 1M per jackpot x the number of balls in play x a multiplier built up by hitting orange arrow shots. Collect five shark jackpots before time runs out to escape the shark and finish the multiball!
Once either multiball has been completed (rescue: super jackpot has timed out, search: five shark jackpots have been scored), victory combos will start for the remainder of both multiballs. In the case of search multiball, victory combos will also start if the player drains out of multiball prior to collecting all five shark jackpots, but after scoring the initial wave of fin jackpots.
When you complete the five beach closures a second time, you will be forced to play the mode you did not select the first time around. This will reset on your third (and every odd-numbered) beach closure wave, giving you a choice again.
Different perks are applied to super celebration multiball for playing either Rescue or Search multiballs:
- Rescue Multiball - increases bumper hits to 10M per hit during the multiball.
- Search Multiball - forces all jackpots to stay lit during the multiball.
Great White Multiball:
The final bounty hunt for the Great White will become available from the bounty hunt selection once the player has sold all of their gear to Quint, or completed bounty hunts for all four sharks. If a bounty hunt is currently active, it must be finished before the player can start the Great White bounty hunt.
The Great White is aptly named as it’s the greatest of all the shark species; “Bruce” is one himself, but plenty of others have invaded the seas around Amity Island. The player will have to use all of their experience hunting for and capturing sharks to catch this beast.
The difficulty of capturing the Great White Shark is determined by the number of bounty hunts the player successfully completed prior to starting this final hunt. Once the final hunt is started, no further bounty hunts can be played this game.
- Great White Shark: 200 spins, 12 3-bank targets, 12 boat shots, 12 chum bucket hits. (Note: these numbers decrease as sharks are captured. Each captured shark reduces spins by 50 and all other shots by 4).
Once the objectives have been completed, hit the fishing reel to start the multiball. If the player caught all four sharks prior to starting the final hunt, they won’t need to complete any objectives and the multiball can be started at the fishing reel.
Great White multiball is a frantic 6-ball multiball with a 30-second ball saver. Every shot is lit to score a jackpot and raise the shark. Hit the shark or hit the center captive ball three times to light the harpoon lane for bounty collect, worth the total bounty that has been raised over the course of the game + 5M per ball in play x the number of sharks captured this game. If the player drains down to less than 6 balls, balls can be added by completing all three arrows in the center captive ball area.
Once the multiball ends by draining down to a single ball, the total will be displayed, but the Great White will evade your capture. He’ll be back…
Super Cast ‘n Catch:
Collect all five fish finder awards to light this mini-wizard mode at the center ramp.
This is a hybrid single-ball / multiball mode where the goal is to collect and score as many cast n’ catch awards as possible. The player must first lock a ball at the mini-flipper via any shot that feeds it, starting a timer for the flip-lock. Then, a new ball will be sent into play, and the player can shoot the center ramp to lock in the cast ‘n catch award (between 500k to 5M, the maximum value increasing by 1M with every jackpot stage started). If the flip-lock times out, the player will need to lock a ball there again to return to increasing / locking in the cast ‘n catch award.
Once the cast ‘n catch award has been locked in, the award can be scored for 15 seconds at all major shots, and a ball can be added with enough chum bucket hits (one ball can be added per jackpot stage, and the amount of hits required increases with every jackpot stage visit). Once the timer has expired, the player returns to locking the ball at the flip-lock, but if any balls were kept alive from the prior multiball, they can be locked at the left orbit or right ramp to multiply the cast ‘n catch award.
Super Cast ‘n Catch ends when only one ball remains in play and the jackpot stage has been played at least once.
Say Ah!:
This mini-wizard mode is exclusive to the Prem / LE models of Jaws, which feature the Orca mini-playfield and wheel awards. Once all five wheel awards have been scored in a single game, the sixth wheel award will automatically be lit. Shooting the wheel will light Say Ah! at the center ramp when no other modes are running. If other wheel award modes were running before starting Say Ah!, they will automatically end.
Say Ah! is a 3-ball multiball timed for 60 seconds, which activates all five wheel awards with increased scoring:
- Shark ramps at 4x value (12M per ramp)
- Light gear at the right ramp
- +3x Machete for the next lit inlane
- Shark combos at 3x value
- Super spinner at 2x value
Ball save is active for the entirety of the 60 second mode, and no other modes can be started or advanced during it.
If Say Ah! has been played during a game, all switch values will be increased by 50k during super celebration multiball.
Smile, You Son of A… (Wizard Mode):
The final wizard mode is lit at the center ramp after playing Jaws Multiball 3 (Cage Dive), so long as no other modes are running. If the player wants to keep playing for other objectives, shooting the center ramp will allow them to choose between starting the wizard mode or continuing for game progression by choosing “keep chumming”.
This wizard mode reflects the crew’s final battle against Jaws and is split into three phases, each ending with a hurry-up shot worth 1M x seconds remaining in the mode. The timer for each phase starts at 60 seconds, and each hurry-up collected adds to the timer (40 seconds for phase 2, 30 seconds for phase 3; if the oxygen tank gear is active then +8 seconds will be added to all timers).
- Quint’s Demise: Alternate between lit shots and the shark. The shots are: center ramp, shark, right ramp, shark, wave ramp, shark, then right ramp for hurry-up.
- Clash on the Mast: Complete the fishfinder targets to light the center ramp to bring up the shark. Bash the shark three times to light left orbit, center ramp, and right ramp for hurry-up.
- Smile, You Son of A…: Alternate between the fin and lit Shark Tower targets; the same Shark Tower target cannot be hit repeatedly. After four fin hits, hit the shark one final time to finish him off!
If the player fails any phase or time runs out, the player can restart the mode by completing the chum line again, then shooting the center ramp.
After completing the final phase, Super Celebration Multiball will start. This multiball plays similarly to the celebration multiball given after completing a bounty hunt multiball but is far more substantial: it’s a 6-ball multiball with a 30-second ball saver. During the multiball, the jackpot values that were built up during previous celebration multiballs, all reel spins score 250k, and perks are given based on the modes that were played prior to it:
- 4th of July - every firework collected adds 150k to all jackpots.
- Bounty Hunts - every bounty hunt completed adds +1x to the super jackpot multiplier.
- Rescue Multiball - every pop bumper hit scores 10M.
- Search Multiball - all jackpots stay lit.
- Say Ah! - 15k is added to all switch values.
“Perfect” completion of the game requires playing all five of the above tasks, capturing all five sharks from bounty hunts in the progress.
When super celebration multiball ends and the player drains down to a single ball, the game will end as our crew returns home to Amity Island, and end-of-ball bonus will be awarded one last time.